This past week a good friend of mine, Blake Rudis (from f/64 Academy), and I decided to take a trip to Zion to shoot and catch up. Blake and I go way back to a photo walk I was part of in San Francisco almost 10 years ago. Since then, we’ve always kept up with each other. Not only is he a great photographer and friend, but he’s also an entrepreneur that’s helped me in immeasurable ways over the years as I started my own business a few years ago. In fact, very few people know that Blake was the driving inspiration for me to go out on my own a few years ago, and I wouldn’t have been successful at it if it weren’t for him.
Anyway, one thing he and I have learned over the years is that when you’re out on your own, working from home, you don’t have access to some of the idea generation and creative processes that take place when you work with others in an office every day. So we decided to take this trip so that we could A) bounce some ideas off each other in a more creative setting than just jumping on a Skype call with each other and B) get some shooting done while we’re at it.
Blake had never been to Zion and I happened to have been taking a little Las Vegas anniversary trip with my wife. So I went out a few days before her, we met up at the airport and our Zion trip was born. Here goes…
The Gear and Photo Processing
As they say, “it’s not about the gear”. But the minute I write this article and don’t mention the gear I’ll get a hundred questions ? I traveled fairly light. One camera body with 3 lenses:
- Sony A7Riii
- Sony 24-70mm f/2.8 GM
- Sony 12-24 f/4 G Lens
- Sony 100-400mm GM
- Really Right Stuff TVC-24 & RRS BH-45 Ballhead
- Some Tiffen Screw-On ND Filters and a B+W Polarizer
As for the photo editing. All photos were edited in Lightroom Classic CC, with Photoshop when needed for removing distractions or a quick sky replacement, and finished with my Lightroom Profiles.
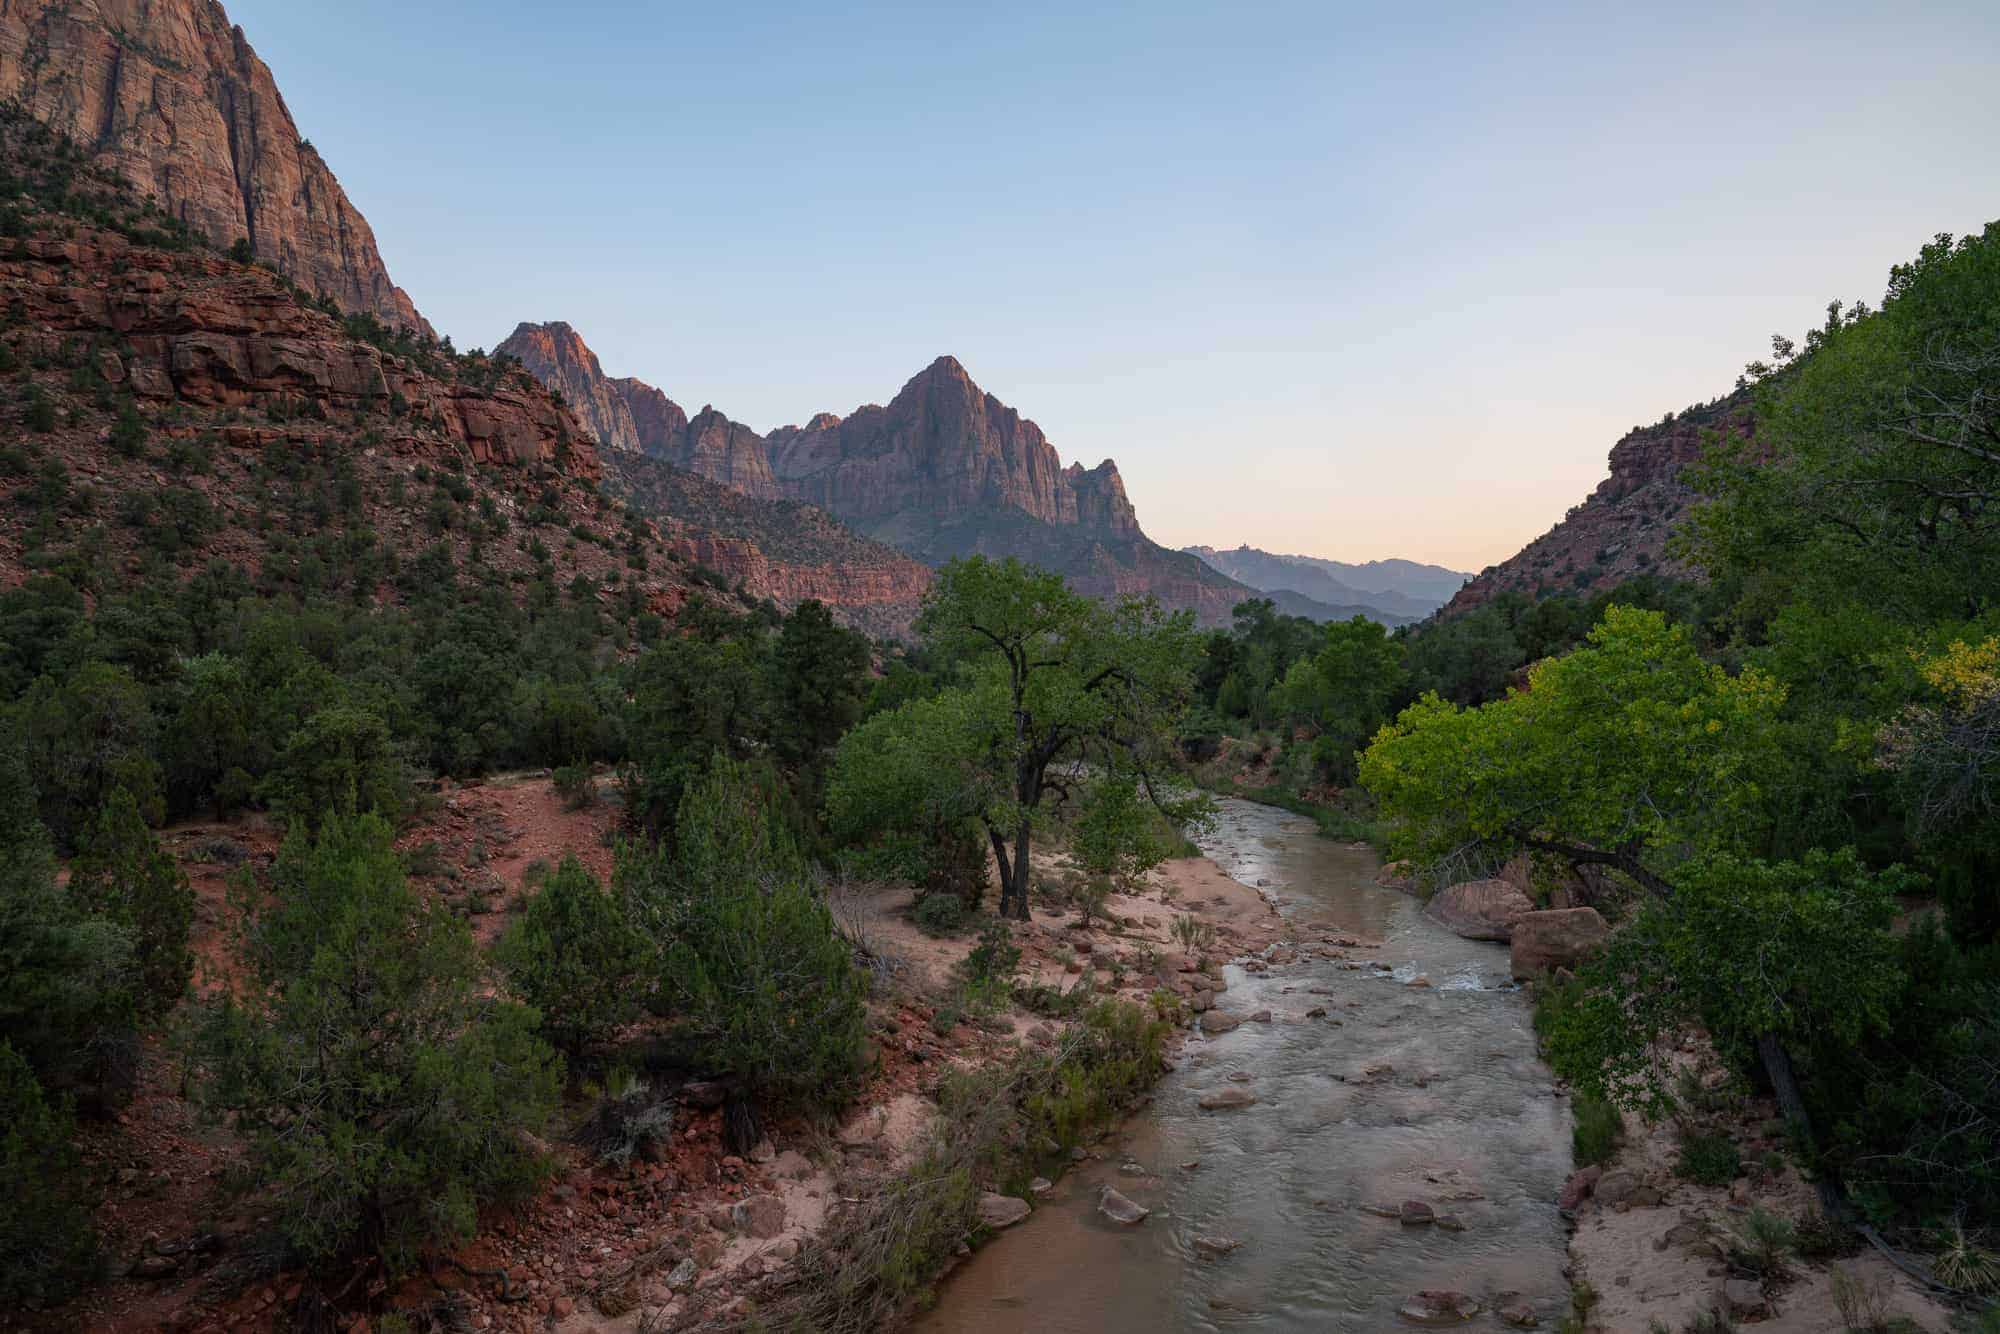
The Watchmen from Canyon Junction Bridge
We got into Zion around dinner time and it seemed the Watchmen overlook from the Canyon Junction bridge was a good place to start. This is probably the most typical view in Zion. It’s easy to get to and has one of the best views of the Watchmen. It’s usually crowded but every time I’ve been there it hasn’t been overwhelming. There were a mixture of 5-6 photographers on tripods, but most other people were just waiting for sunset and shooting with their cell phones. The sunset was kind of blah that evening but hey… we’re shooting right? So I can’t complain that much ? But it did seem like the sun went behind some clouds and it just got very flat early on and never regained.
Settings: f/11, 1/10 sec, ISO 100, 24mm (Sony 24-70mm GM)
The next day we hiked the Narrows (more on that in a minute) and were pretty tired. We really didn’t feel too much like shooting anywhere serious again, so we went to the same bridge for sunset again. This time it definitely shaped up better. First we had more light before sunset which set up nicely for this photo.
Settings: f/11, 1/8 sec, ISO 100, 24mm (Sony 24-70mm GM)

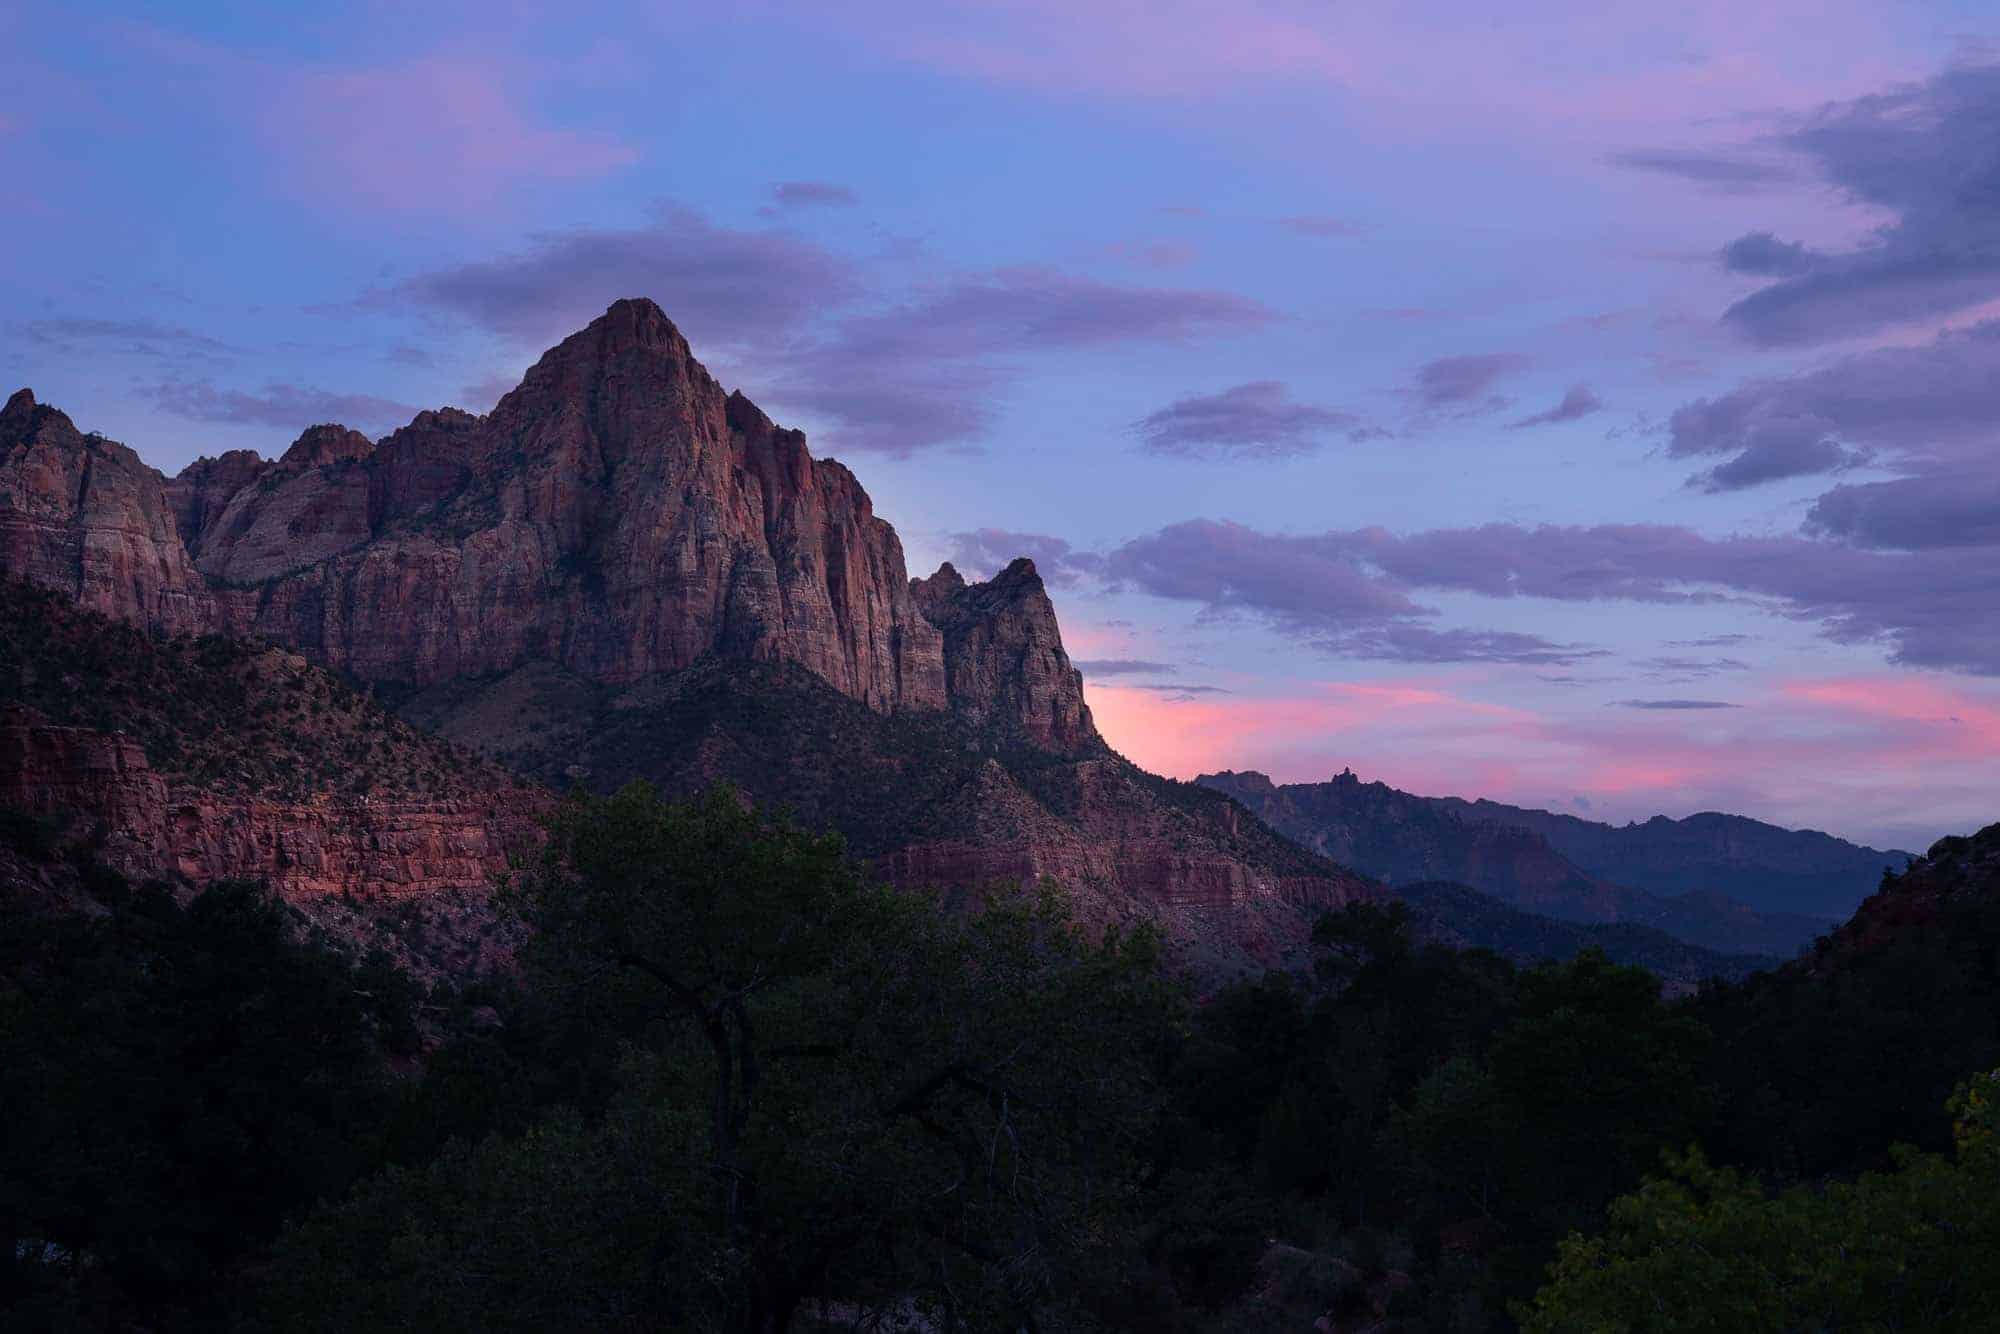
Then, I was about to pack up. Don’t get me wrong. The blue hour and post-sunset is one of my favorite times to shoot. But it just didn’t look like it was going to do anything this evening. But Blake convinced me to stay and I’m glad I did. We got some nice pink clouds about 20-30 minutes after sunset and it made for a pretty backdrop.
Settings: f/11, 0.5 sec, ISO 200, 60mm (Sony 24-70mm GM)
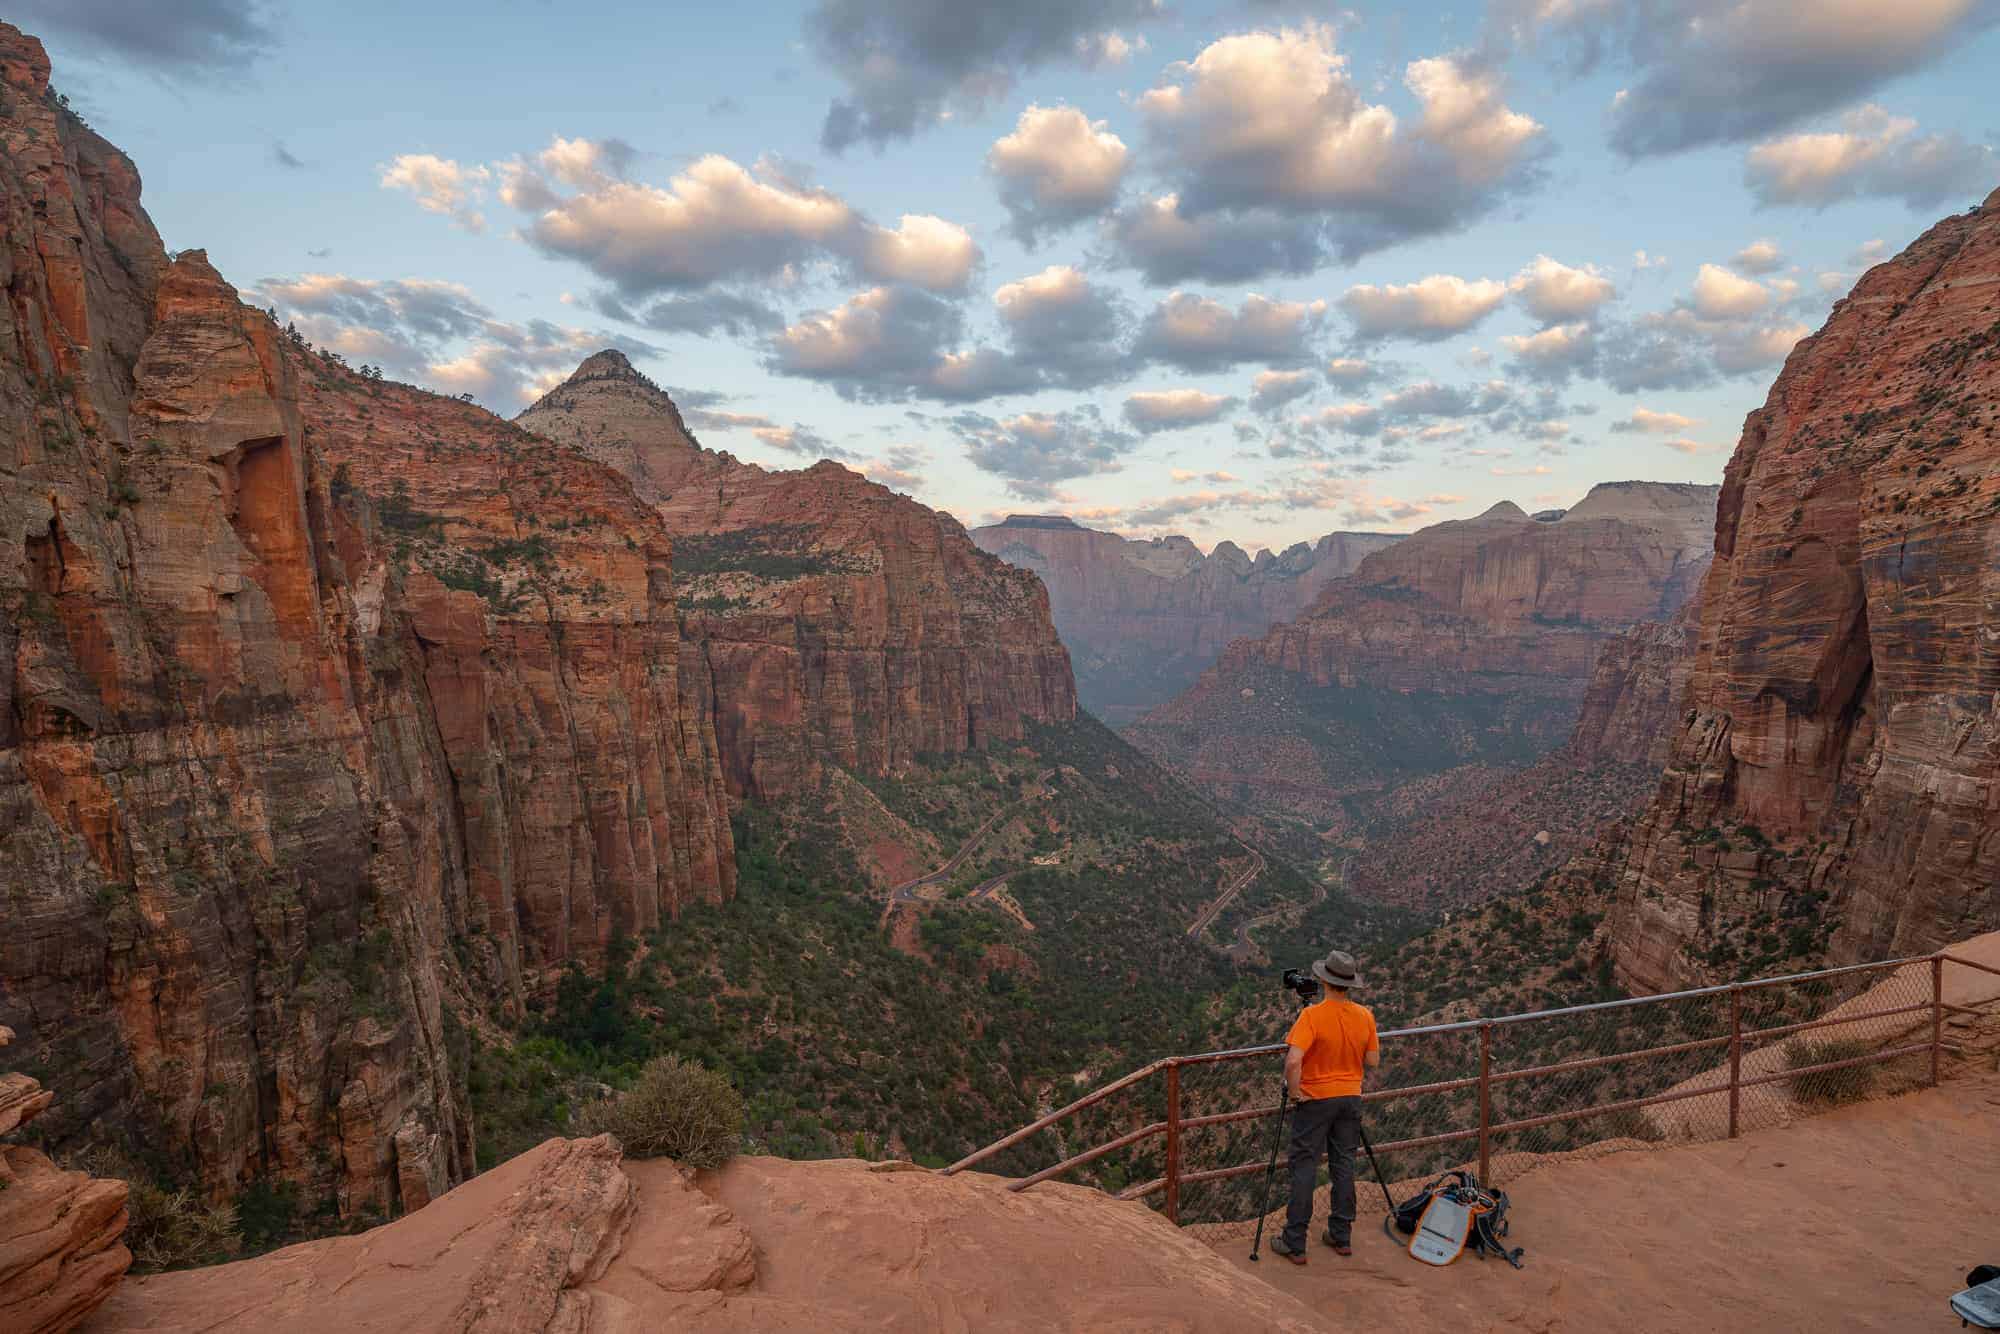
Canyon Overlook
On our first morning, we decided to head to a place called Canyon Overlook. It’s about a 15-20 minute hike in and out, and pretty easy to get to. When you get to the end, you’re rewarded with an amazing look out across the canyon. The clouds looked amazing before sunrise and I thought we’d get some amazing color up there. But it never really happened. It was still a great sunrise spot though. I shot it mostly with a 24-70 to pull in most of the canyon. I did put the 12-24mm on at one point. But for me, this is not a foreground spot. The canyon and rock formations are too extraordinary to minimize them so I felt like it was a better spot to zoom in.
Settings: f/11, 1/6 sec, ISO 100, 24mm (Sony 24-70mm GM)

Settings: f/11, 1/125 sec, ISO 100, 24mm (Sony 24-70mm GM)

Blake and His Hat!
Going on trips with friends is always fun. One thing I never knew about Blake was his magical hat. It’s like his source of photographic power. If he forgot it, we had to turn around and go get it or he slowly started to fade away 😉 And of course you develop those funny moments with each other. For example, in the photo below, Blake had recently put his 10mm lens on and said “you know what they always say… Go wide or go home!”.
My response: Who’s “they” Blake and I don’t think I’ve ever heard anyone say that! lol! Fun times… And if you want a real laugh… next time you see Blake or talk to him online ask him about his theory on how the arches in Arches NP were formed. Wow!!!
Settings: f/11, 1/8 sec, ISO 100, 18mm (Sony 12-24mm GM)
Settings: f/11, 1/125 sec, ISO 100, 70mm (Sony 24-70mm GM)
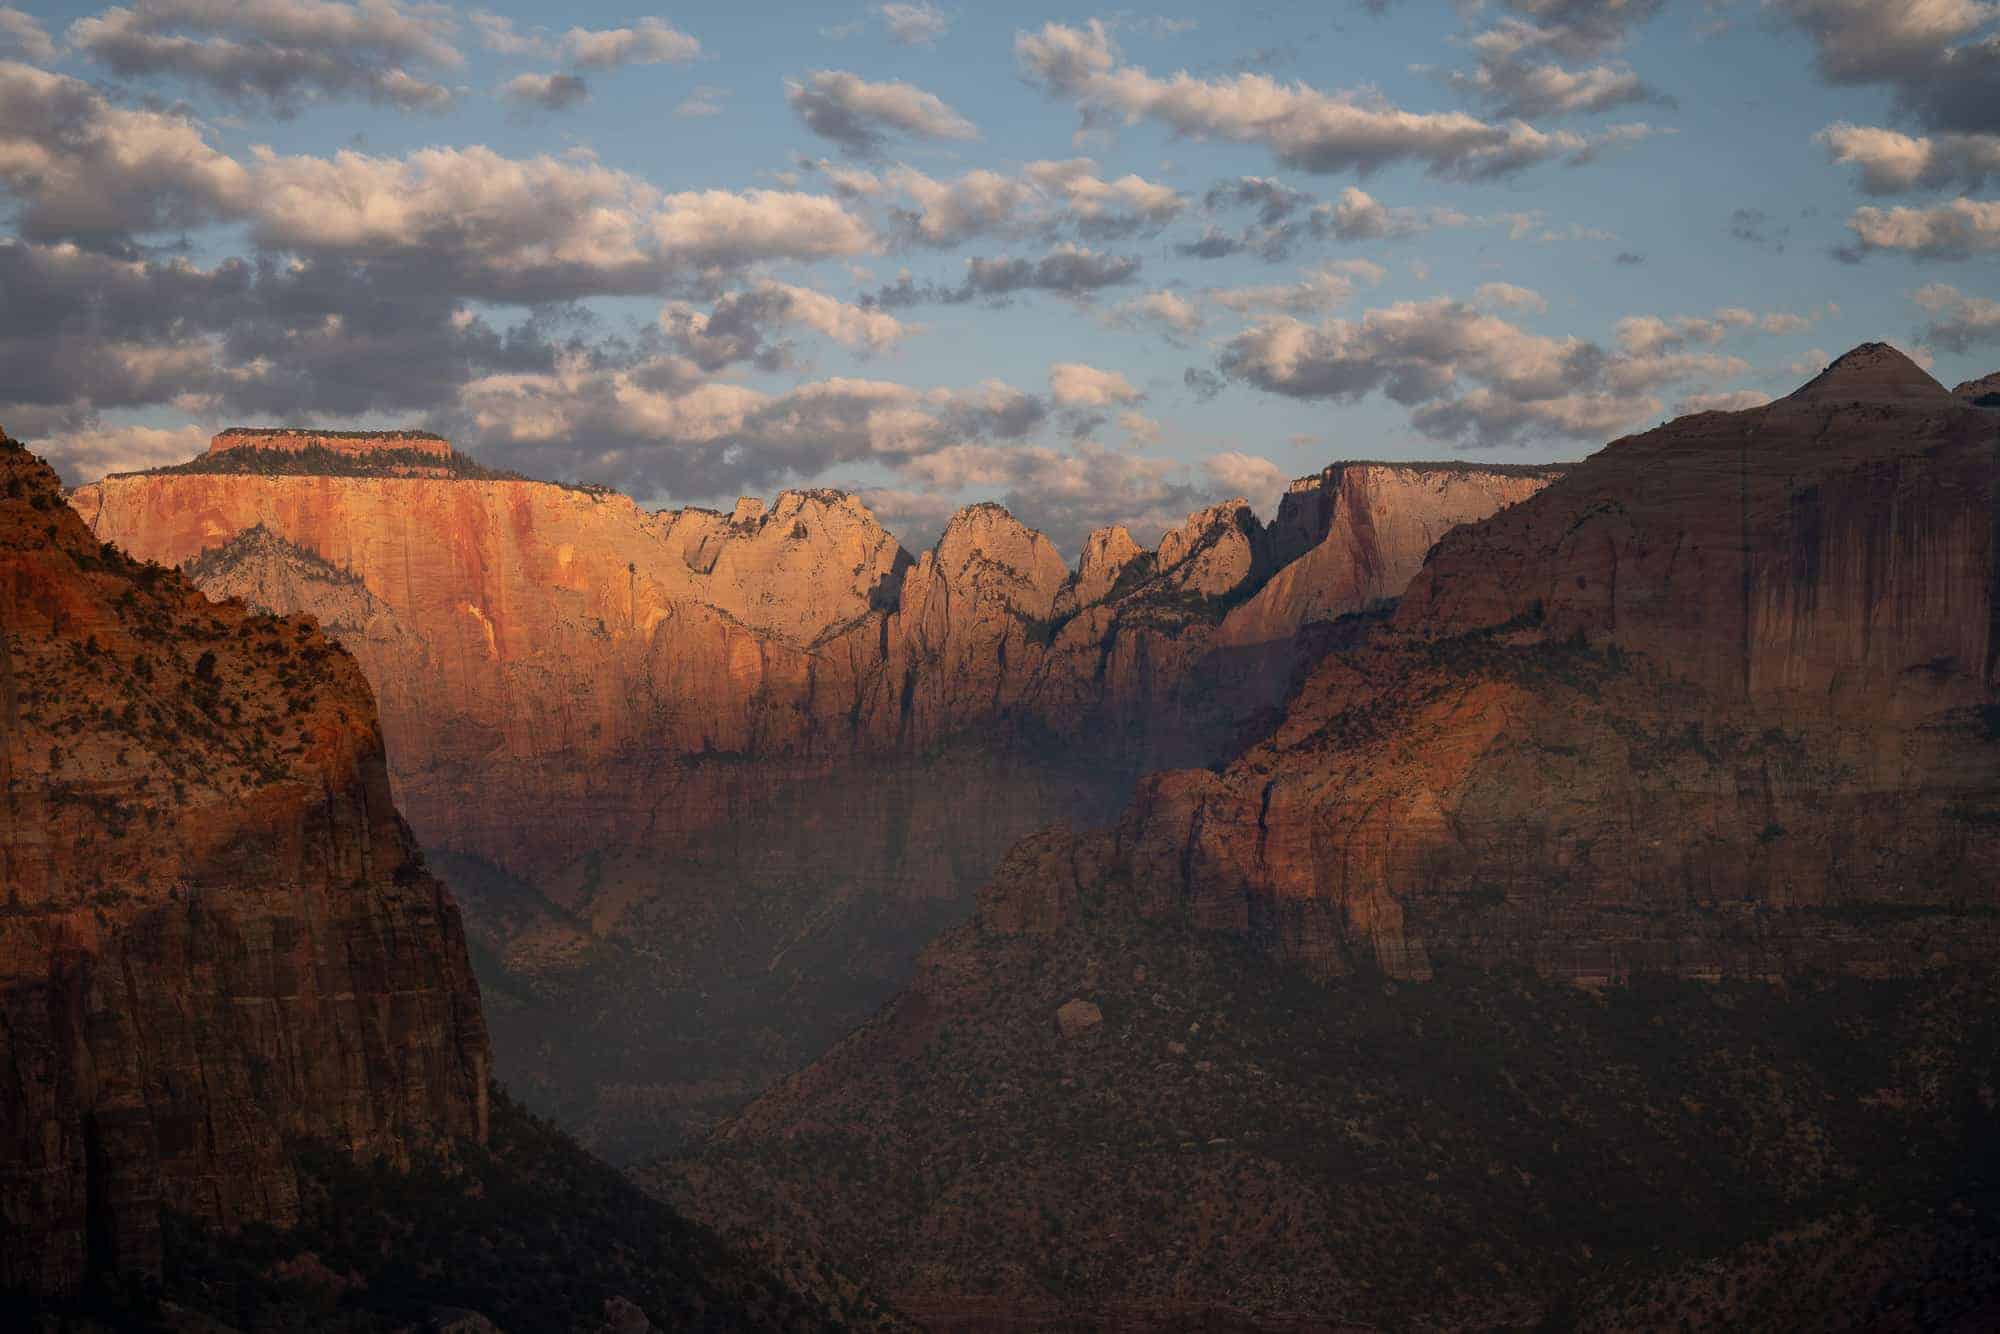
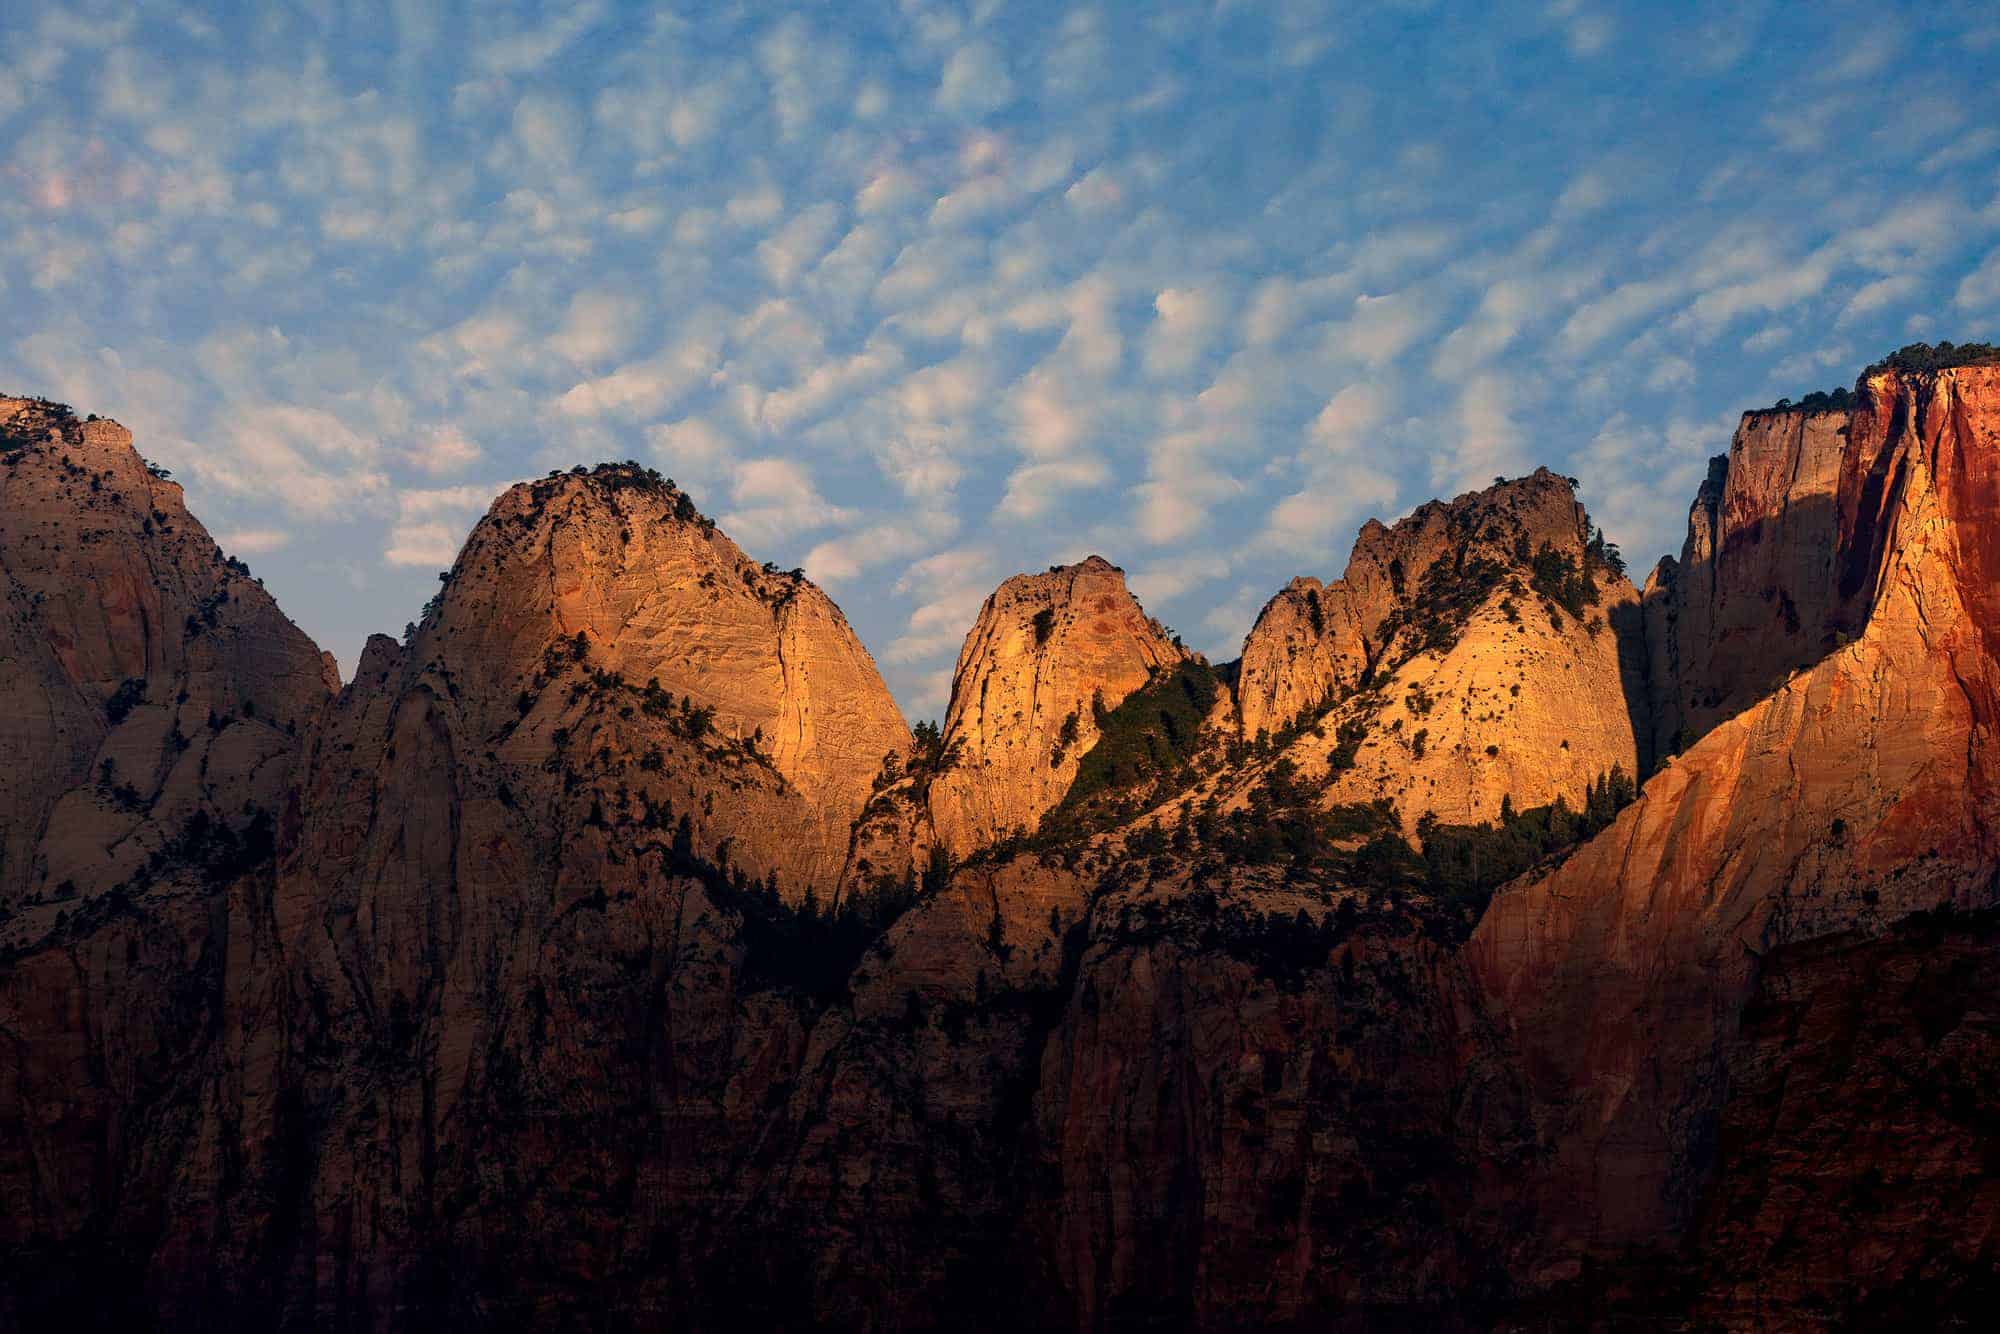
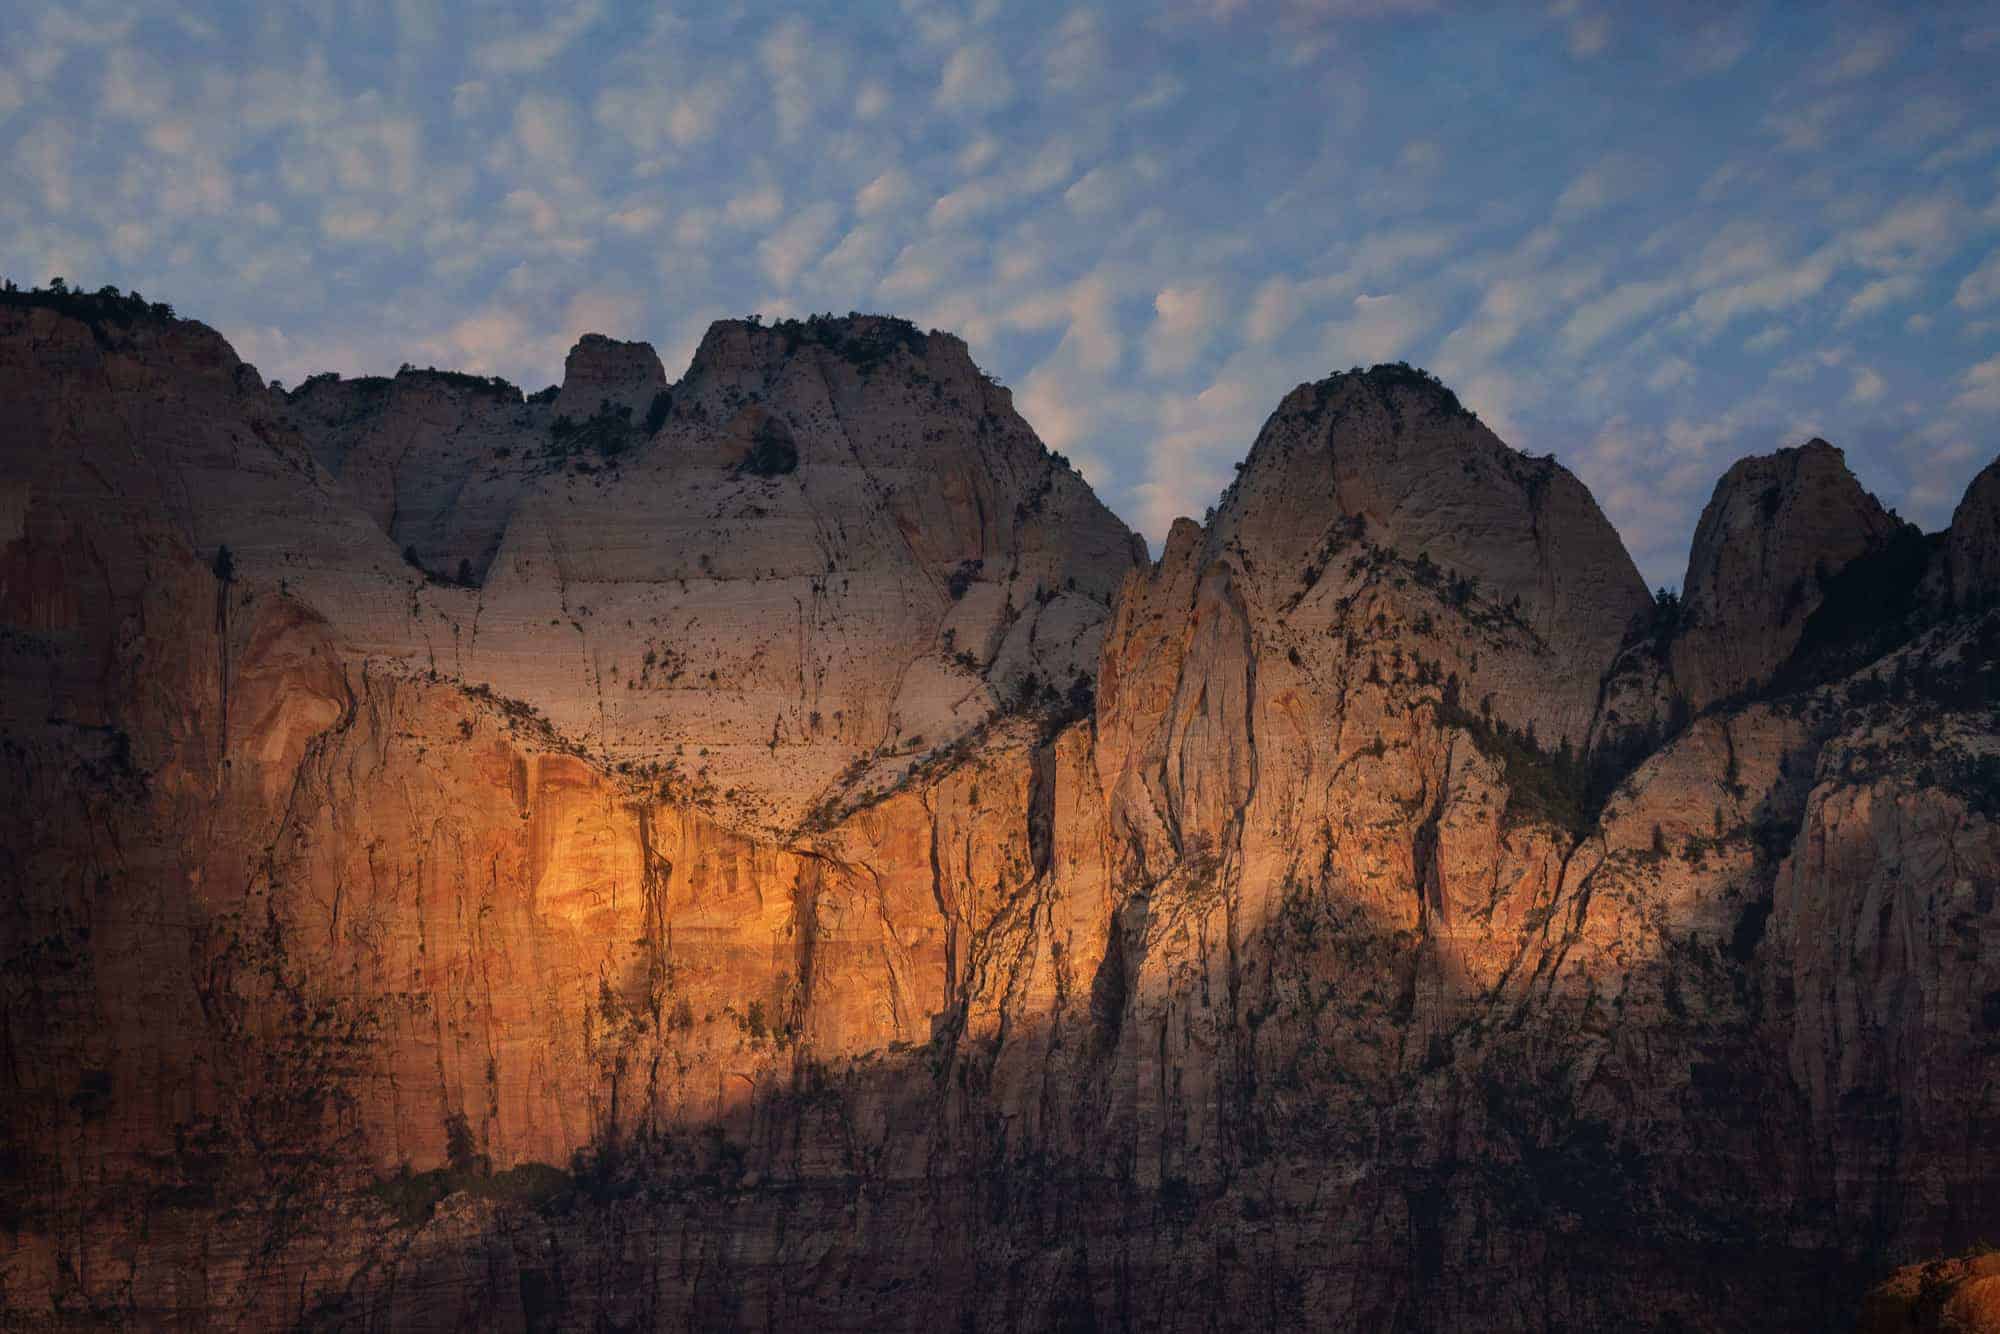
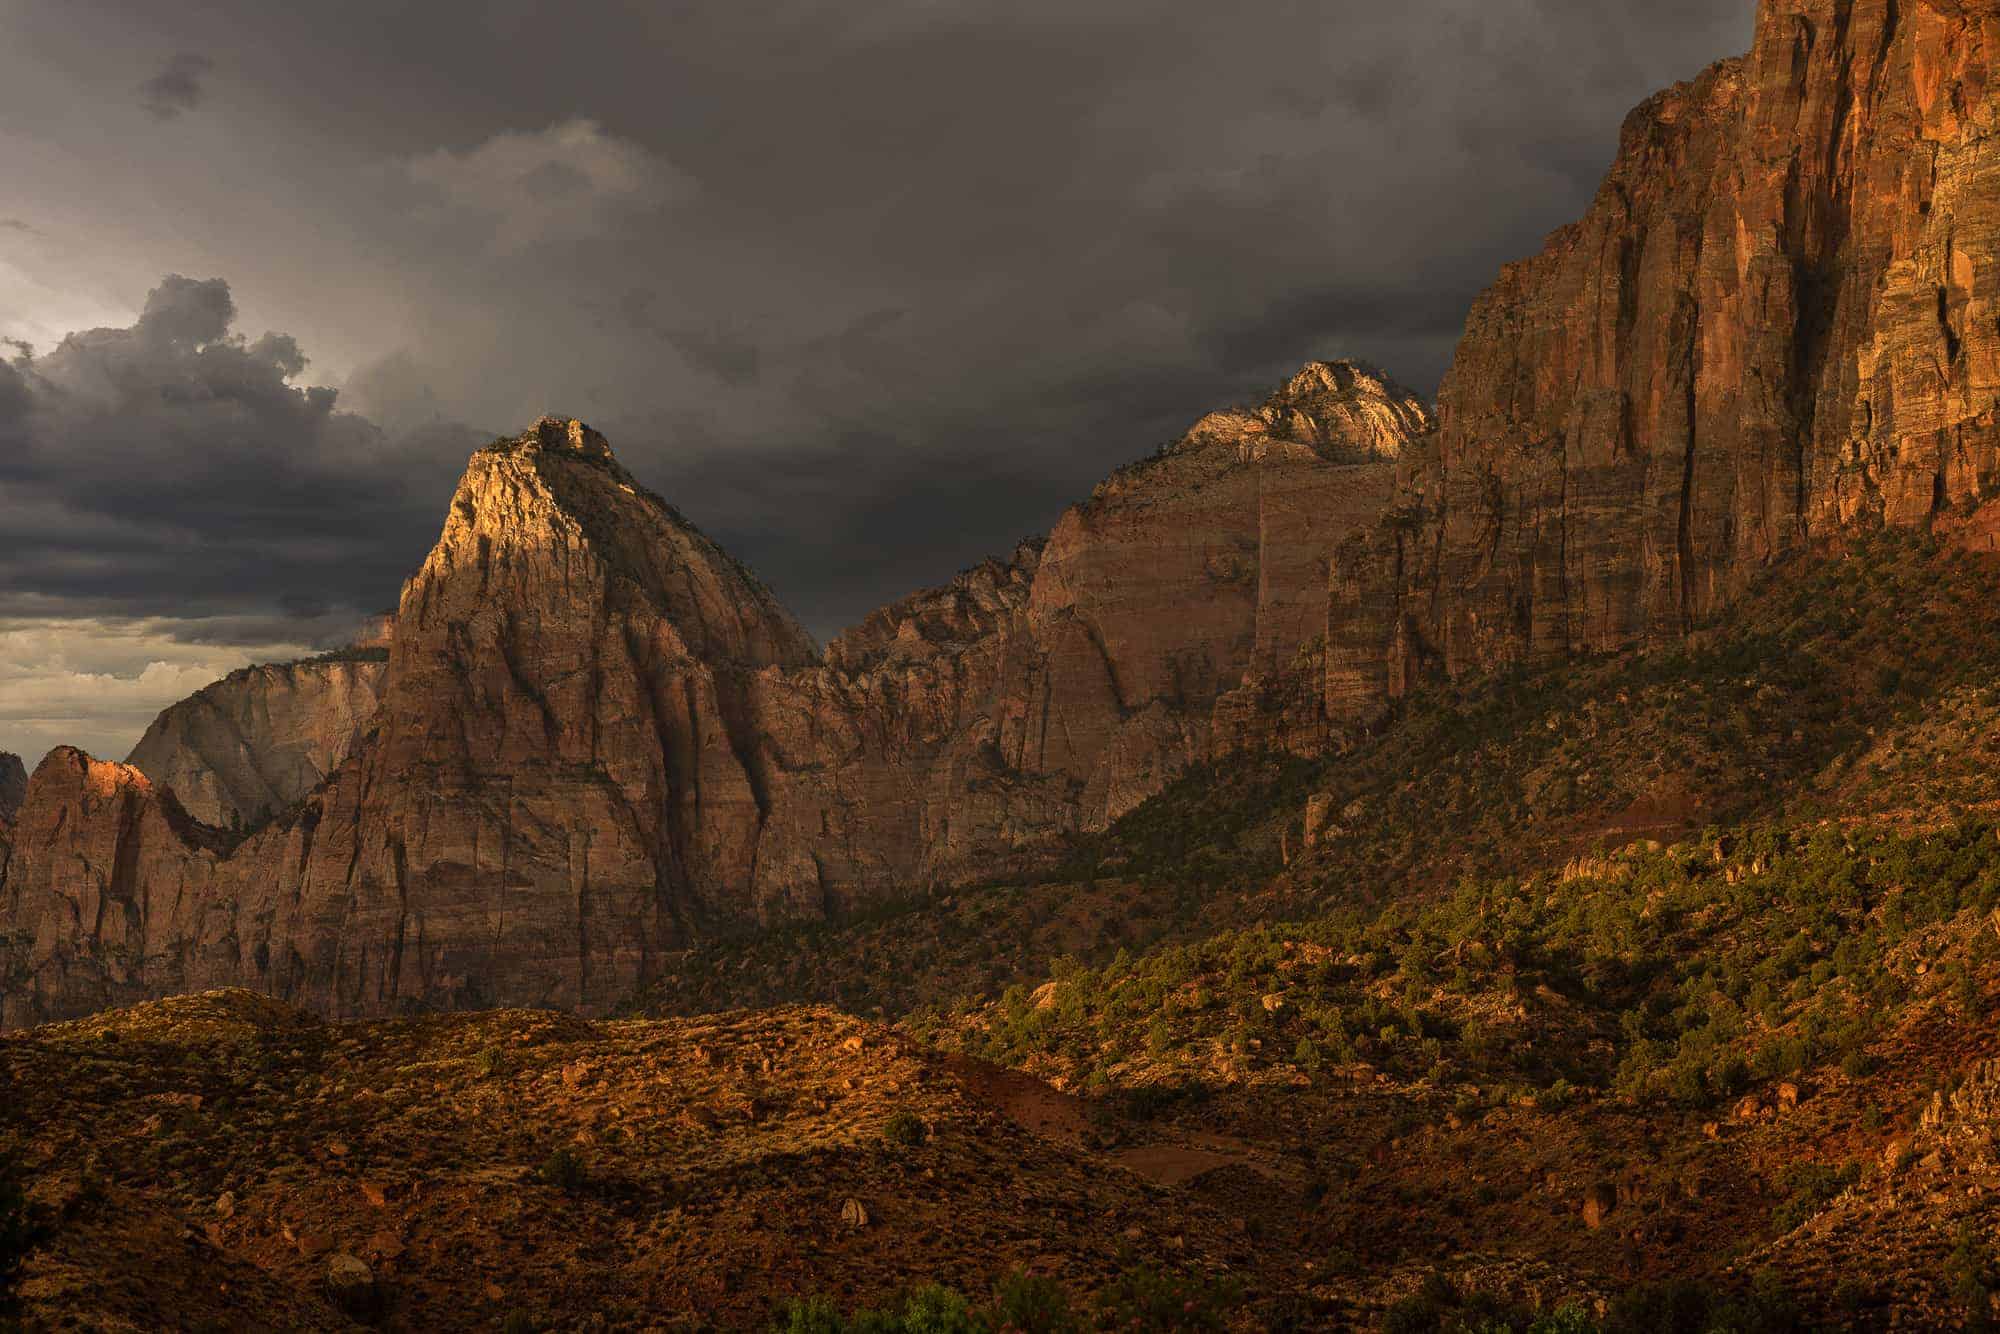
Fast Changing Light
A little while after sunrise, this amazing light started to hit the Towers of the Virgin peaks in the far distance. I learned a long time ago in studio photography that if you want to make something look more interesting, then only light part of it. We don’t get that choice with landscapes though. But I have figured out that when the sun and the clouds do it for you to take a photo of it… and fast… because it’ll probably fade in seconds 🙂
So I grabbed my 100-400mm lens, zoomed in and grabbed a few photos of the amazing light. As you’ll see in a moment, we actually ended up back at this location the next day and the light was different so I did it again. On the first day, the photo kind of felt like it would make a great black and white. But on the second day the light was just different so I left it color.
Settings: f/8, 1/500 sec, ISO 100, 224mm (Sony 100-400mm GM)

Settings: f/8, 1/320 sec, ISO 100, 192mm (Sony 100-400mm GM)
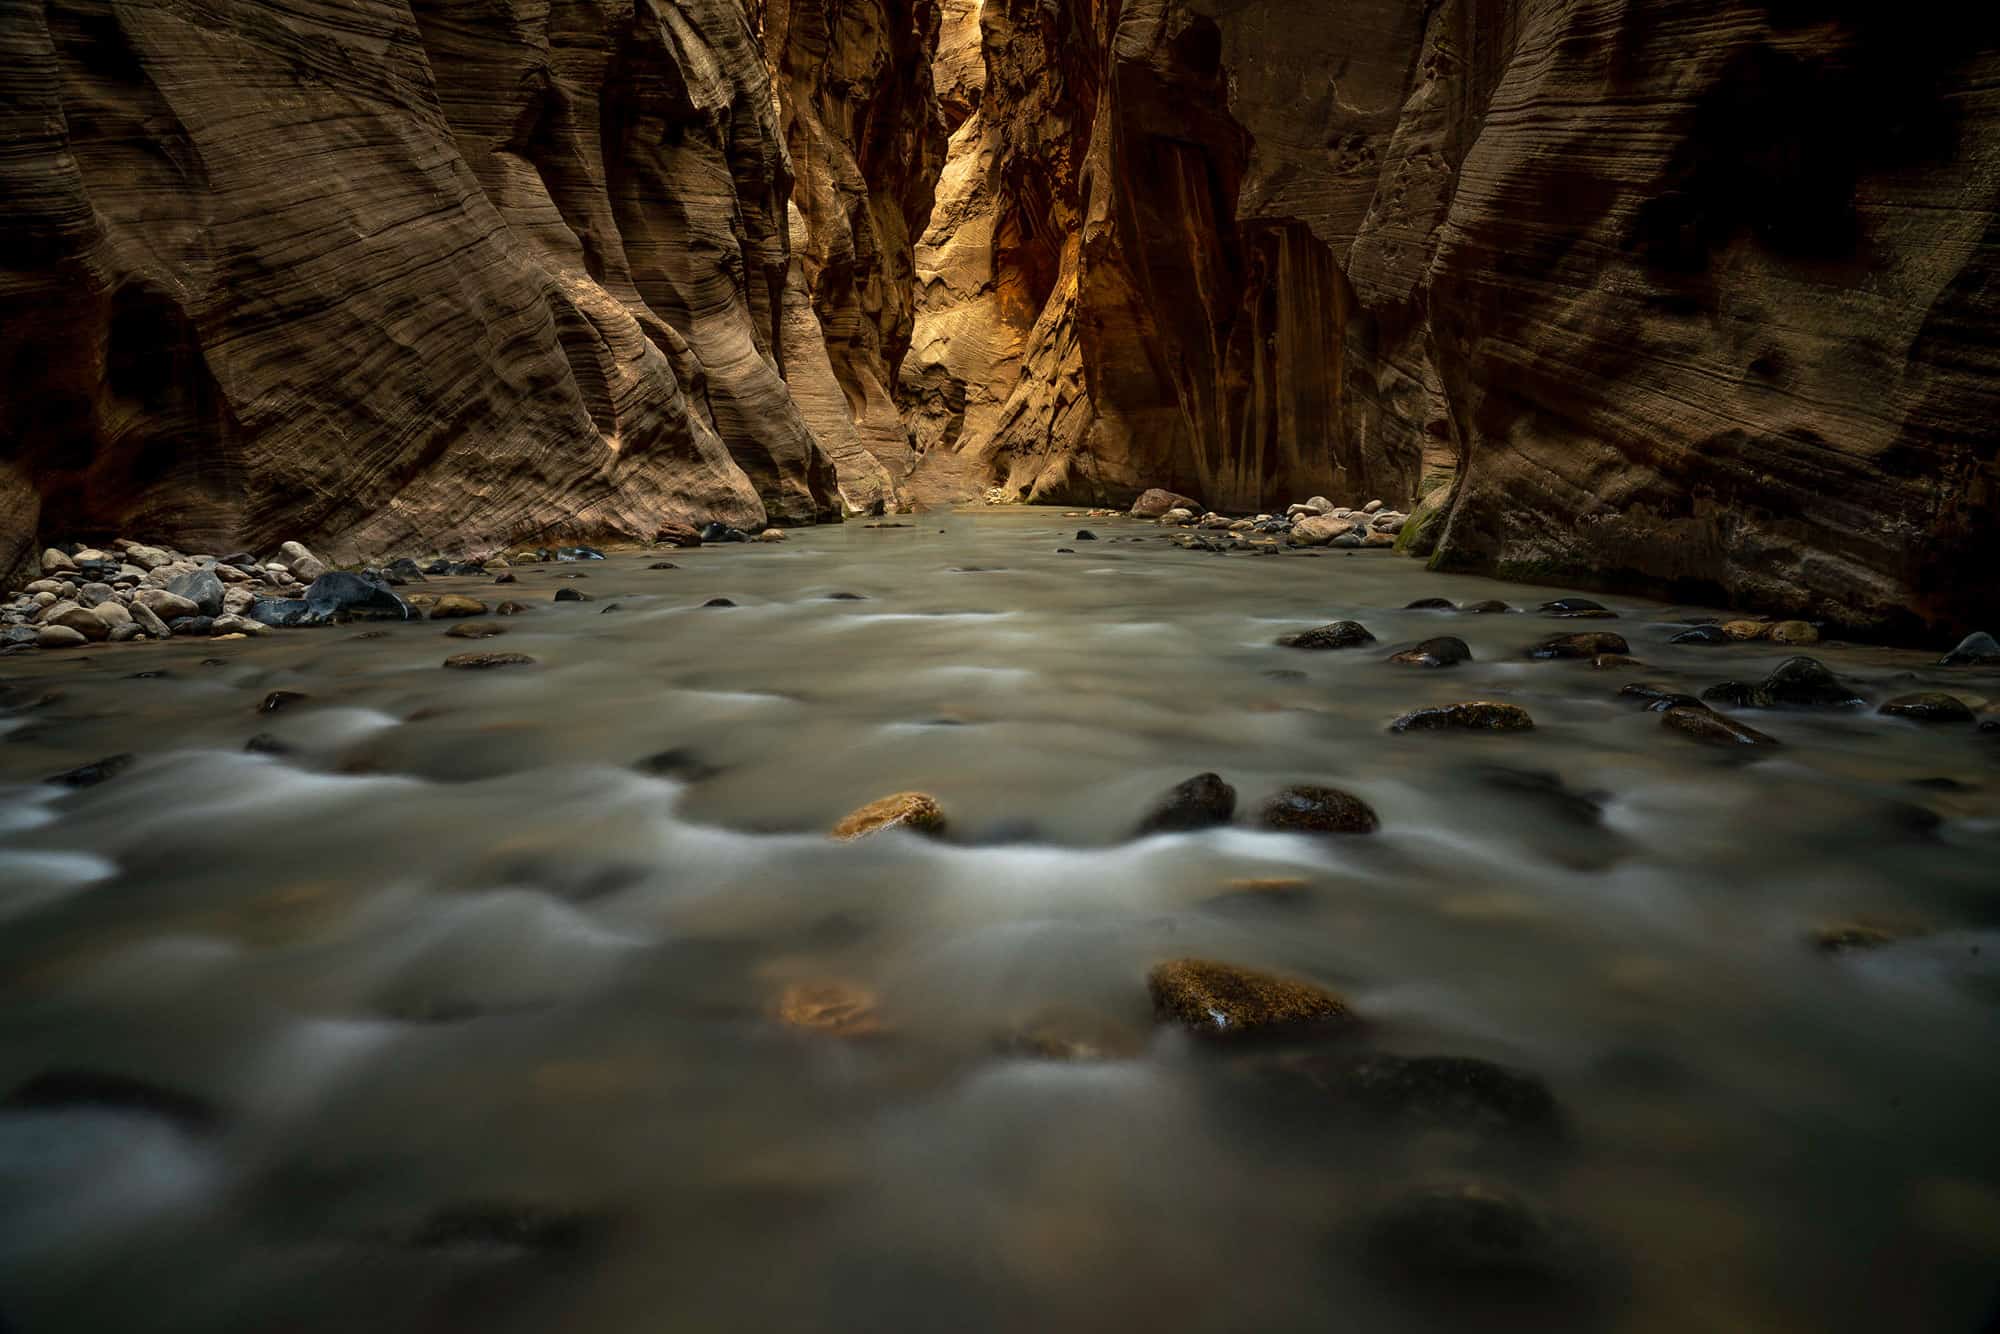
The Narrows
I’ve been to Zion a few times but never had the chance to hike the narrows. So that was on the top of my list for this trip. Blake and I did our research and found you didn’t need a permit for the area we wanted to hike (we’ll nickname that area “Tourist Central”). You just take the Zion Bus to the last stop, get out, and start walking… and walking… and walking…
SIDENOTE: For almost all of the photos in the Narrows I had my B+W Polarizer on with a Tiffen 2-Stop Screw-on ND Filter
Settings: f/16, 0.8 sec, ISO 200, 24mm (Sony 24-70mm GM)
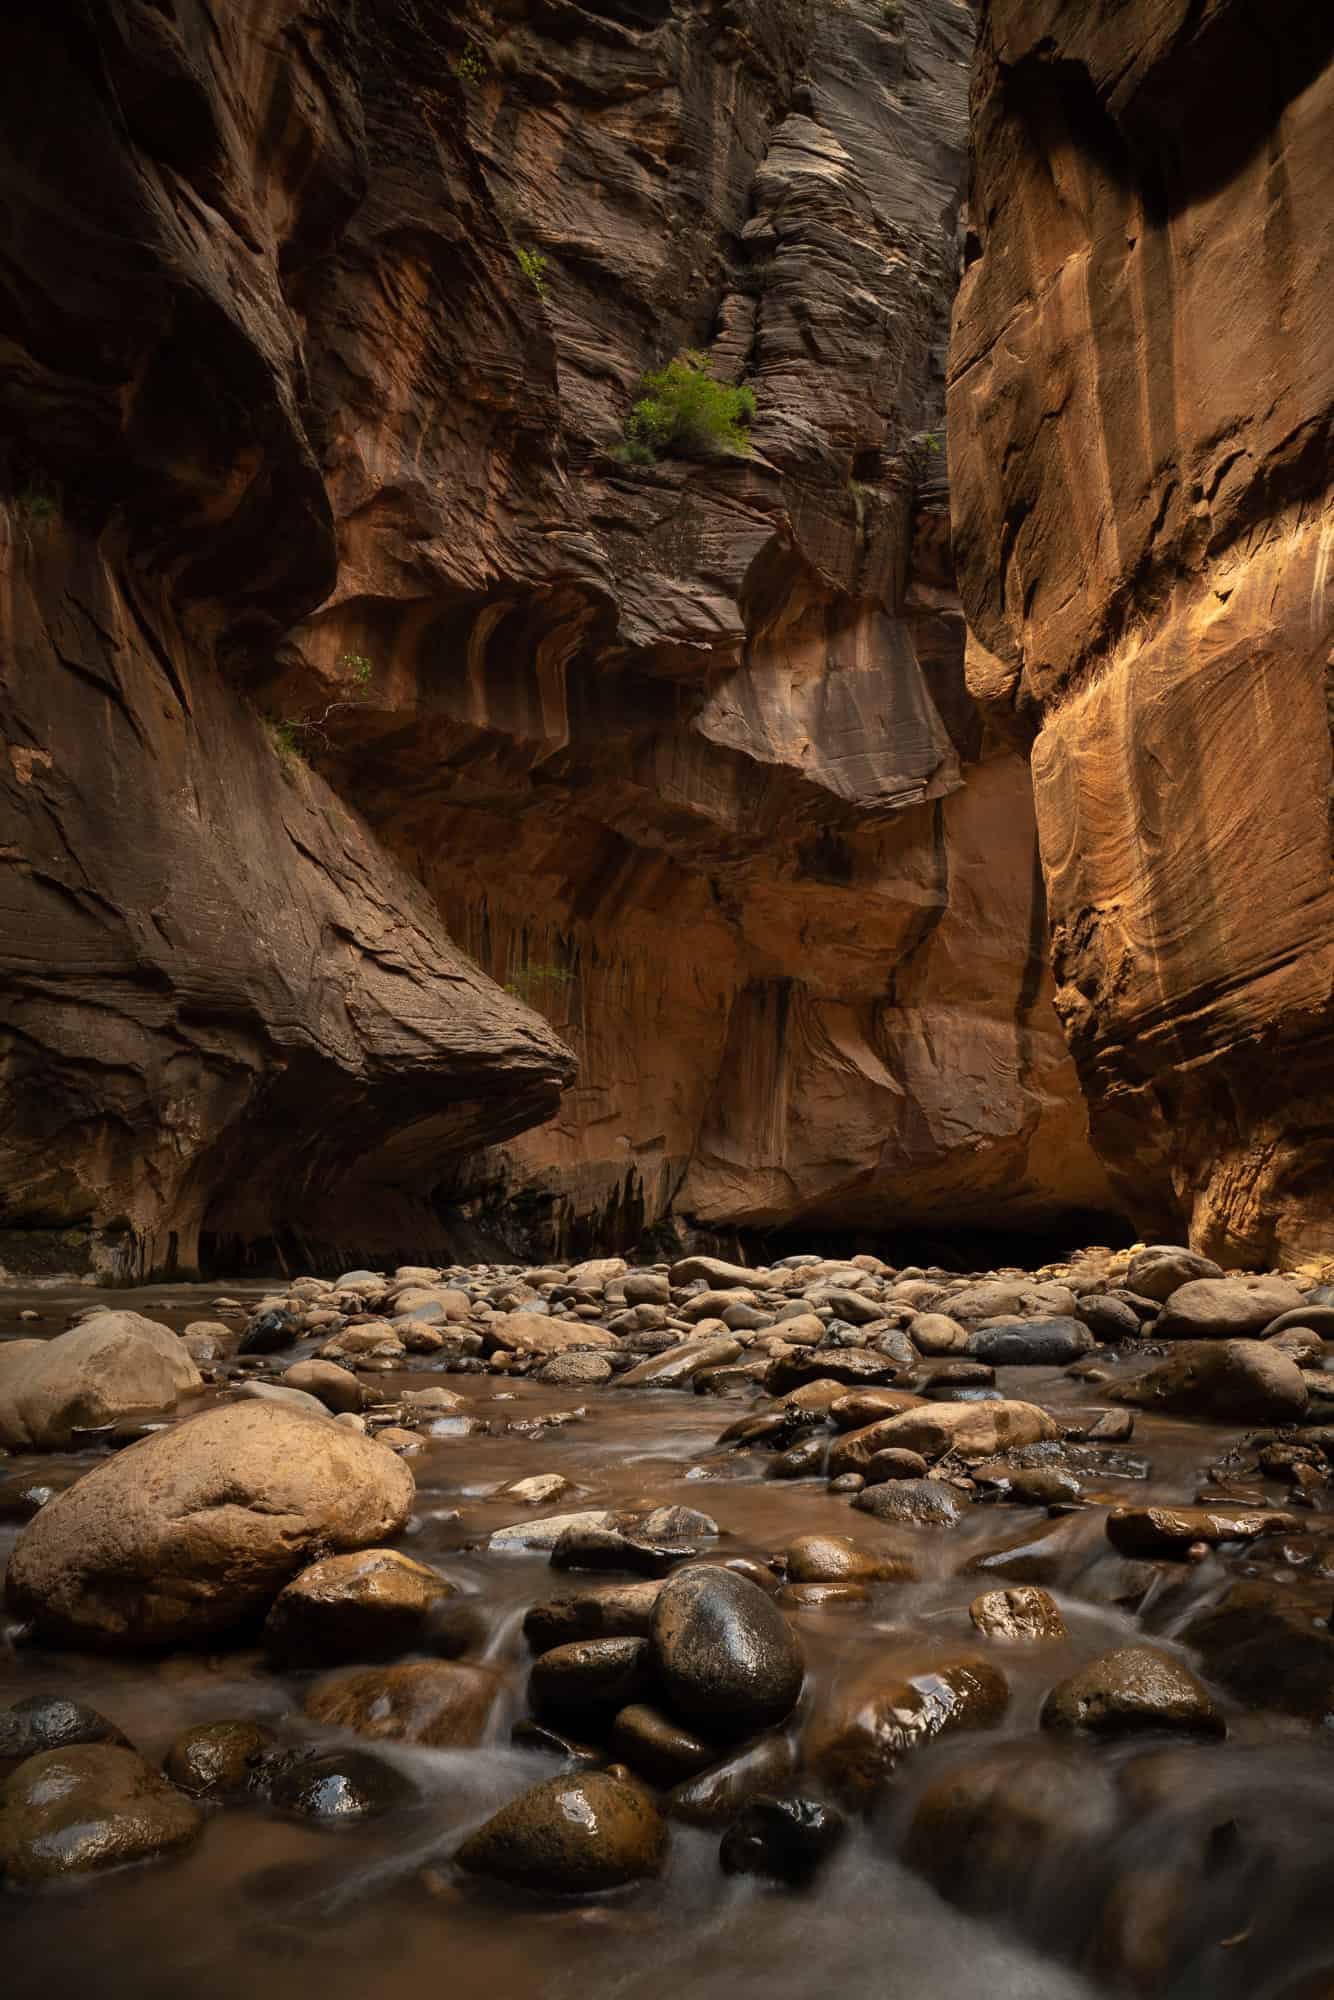
It’s a LONG 20+ minute walk just to get to the good part where the path ends and you have to get into the water. And then you hit the water and it was literally mobbed with people. I swear there were about 300 people condensed into the first 300-400 yards of the Narrows. We just put our heads down, and kept hiking, knowing that it would thin out and the shooting would get good.
And it did. See, it’s a rocky river bed and if you don’t have the right shoes on, it gets almost impossible to keep walking on it. So while the people with flip flops or bare feet made for some big crowds in the beginning, you could tell it was painful – they thinned out and dropped off pretty fast. Usually within the first 5-10 minutes.
Settings: f/16, 2.5 sec, ISO 200, 43mm (Sony 24-70mm GM)
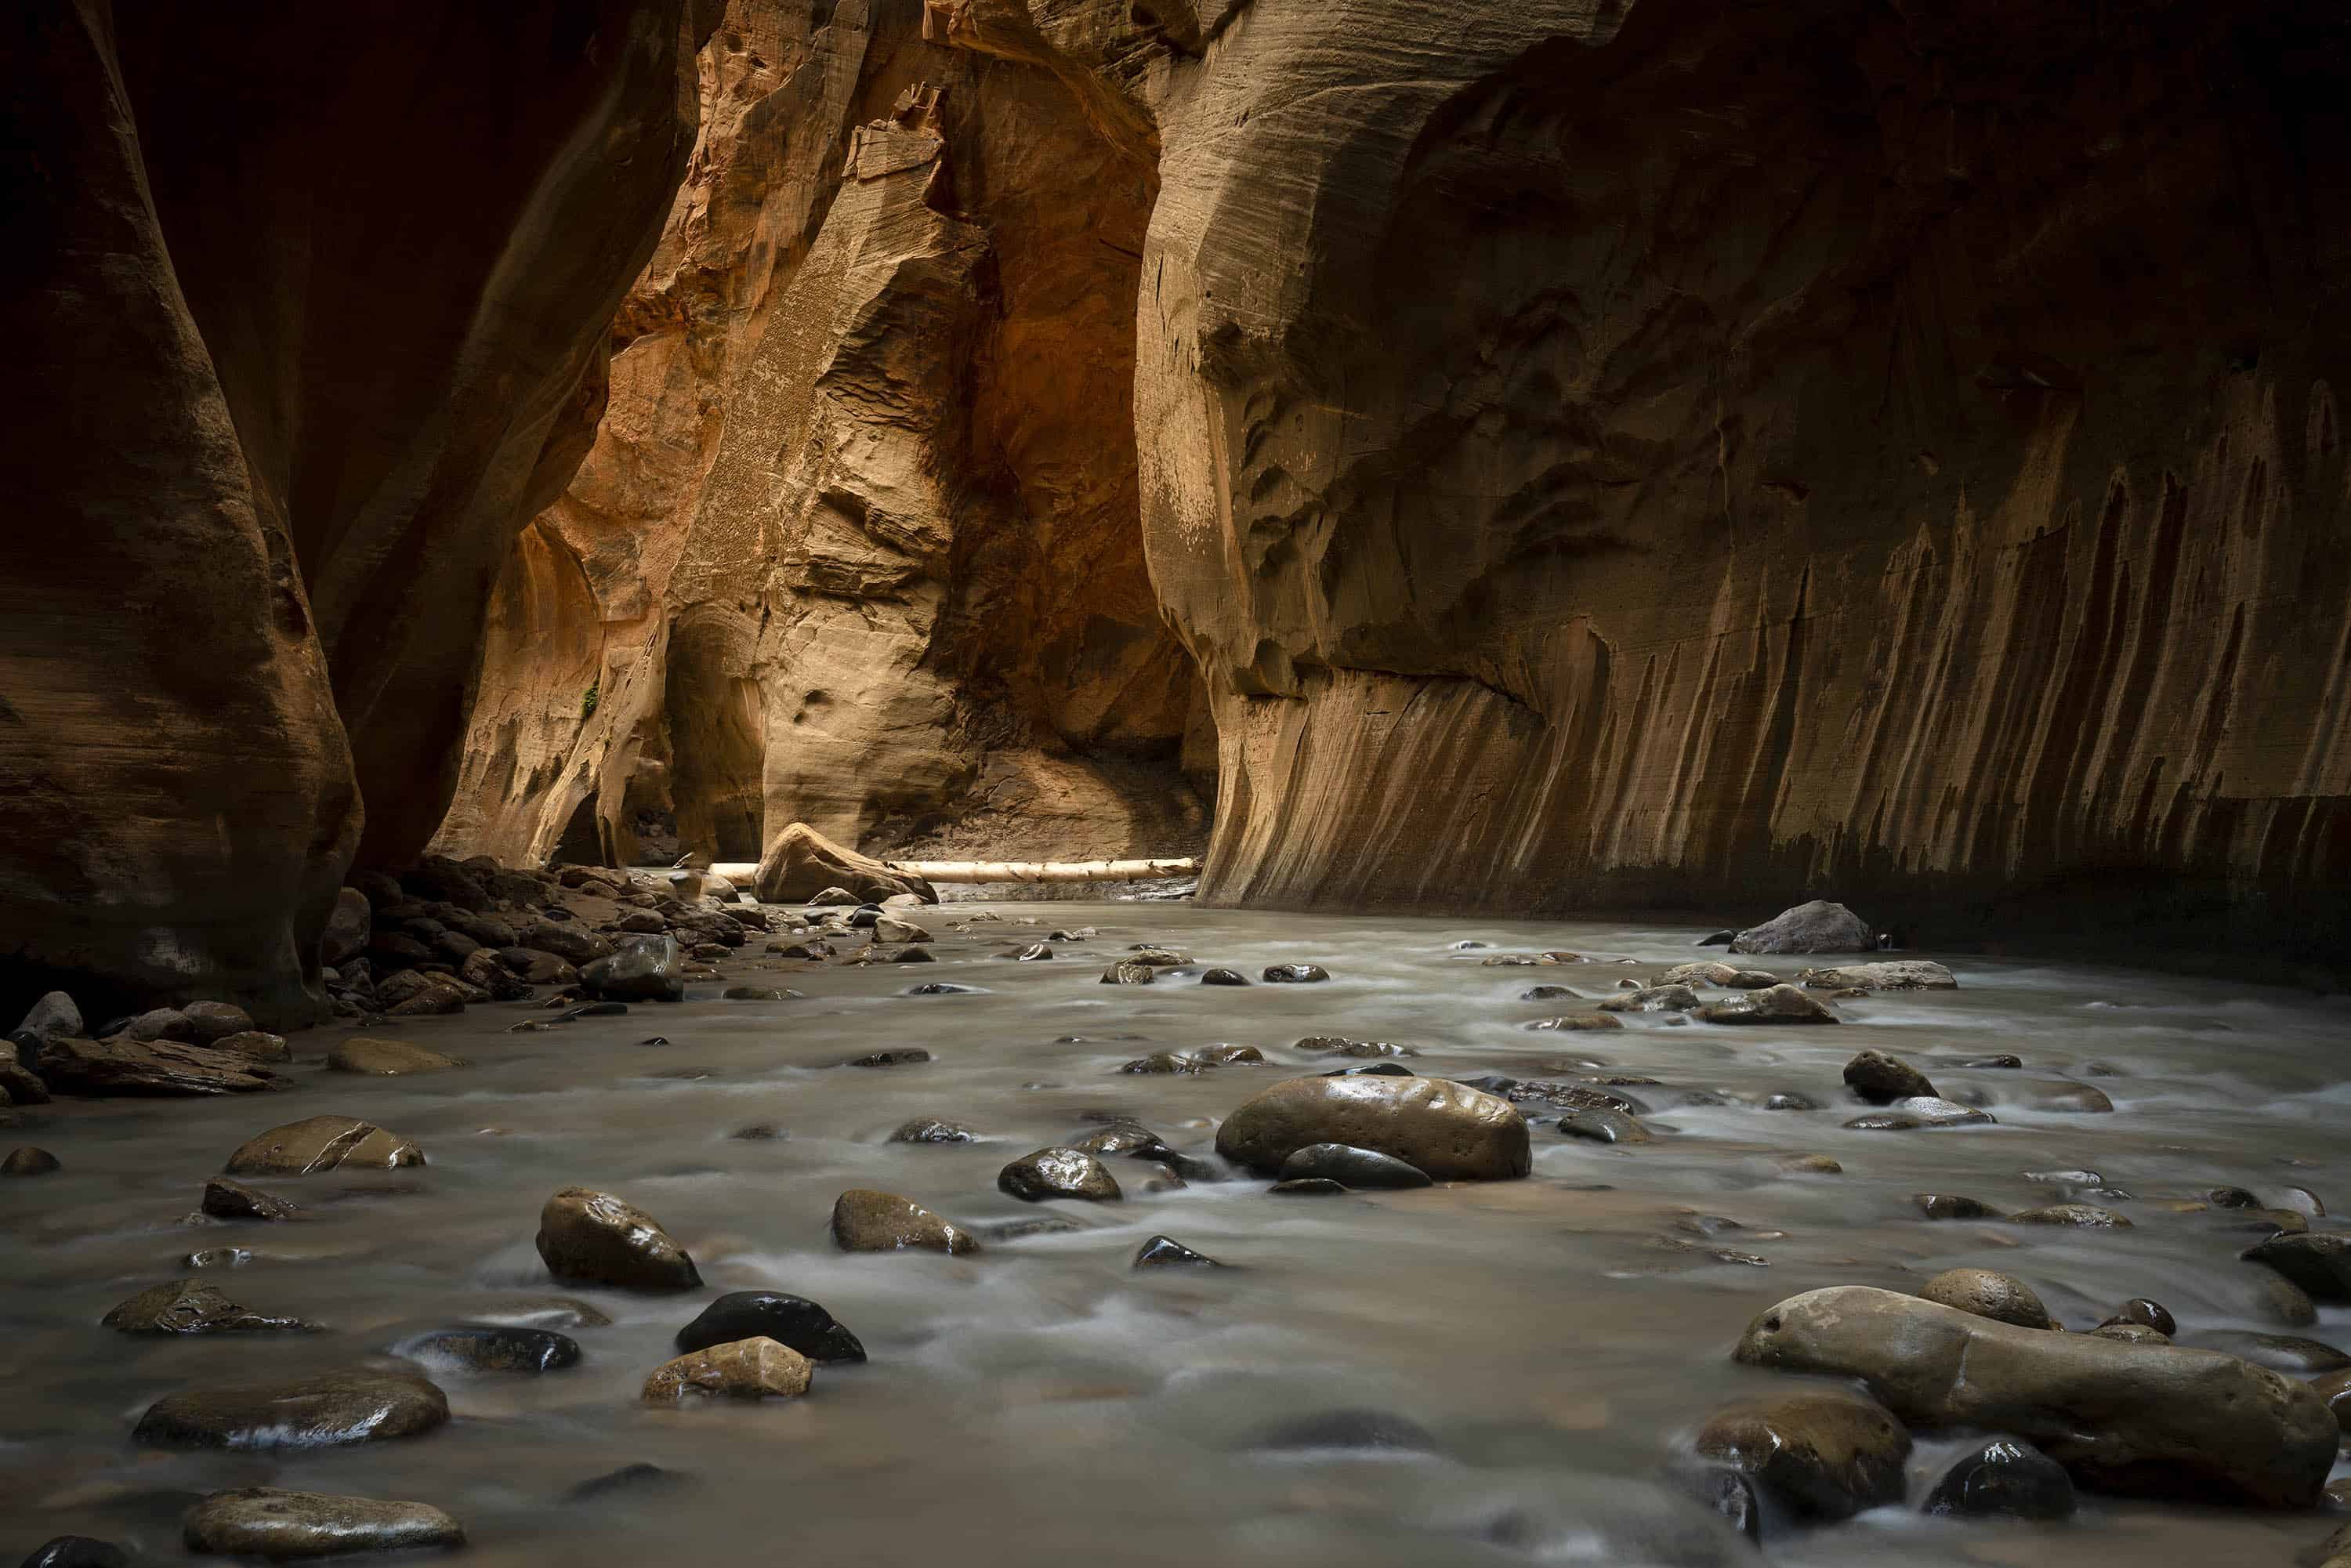
So then that left only those that had good shoes on and really wanted to hike up the narrows. I rented a pair of Aqua Lace boots and neoprene socks from Canyon Outfiitters for $25 and a wet bag for my gear for another $10. The water actually wasn’t high enough (waste deep at the worst part this time of year) that we would have needed the bag, but the people at the store said that they even put their gear in the bag, because it was easy to slip and submerge yourself a little deeper than normal. For $10, we figured it was a good insurance policy ?
Settings: f/11, 1/10 sec, ISO 100, 24mm (Sony 24-70mm GM)

Settings: f/16, 1 sec, ISO 200, 16mm (Sony 12-24mm GM)

Settings: f/11, 1/10 sec, ISO 100, 24mm (Sony 24-70mm GM)

Settings: f/16, 8 sec, ISO 200, 24mm (Sony 24-70mm GM)
As you can imagine, the summer months are pretty touristy and there were a good amount of people hiking that day. At first it was a little frustrating, since it was nearly impossible to get a photo without someone in it. But then we realized we’re both shooting really wide, and the people in the photo were pretty small. And, Blake and I had to remind ourselves that we’re halfway decent at Photoshop. So we knew they’d be gone with some Content Aware and a few strokes of a brush in Photoshop 😉
Once we came to grips with that, shooting became much more pleasant. Below is typical shot of what we saw most of the way after the large crowds dropped out – and then what it looked like after I edited them out (this one took about 15 seconds). You’d think it would be easy enough to wait for people to pass, but there was just always someone walking through and it’s not fair for us to ask them to wait.
Settings: f/11, 1/8 sec, ISO 200, 24mm (Sony 24-70mm GM)


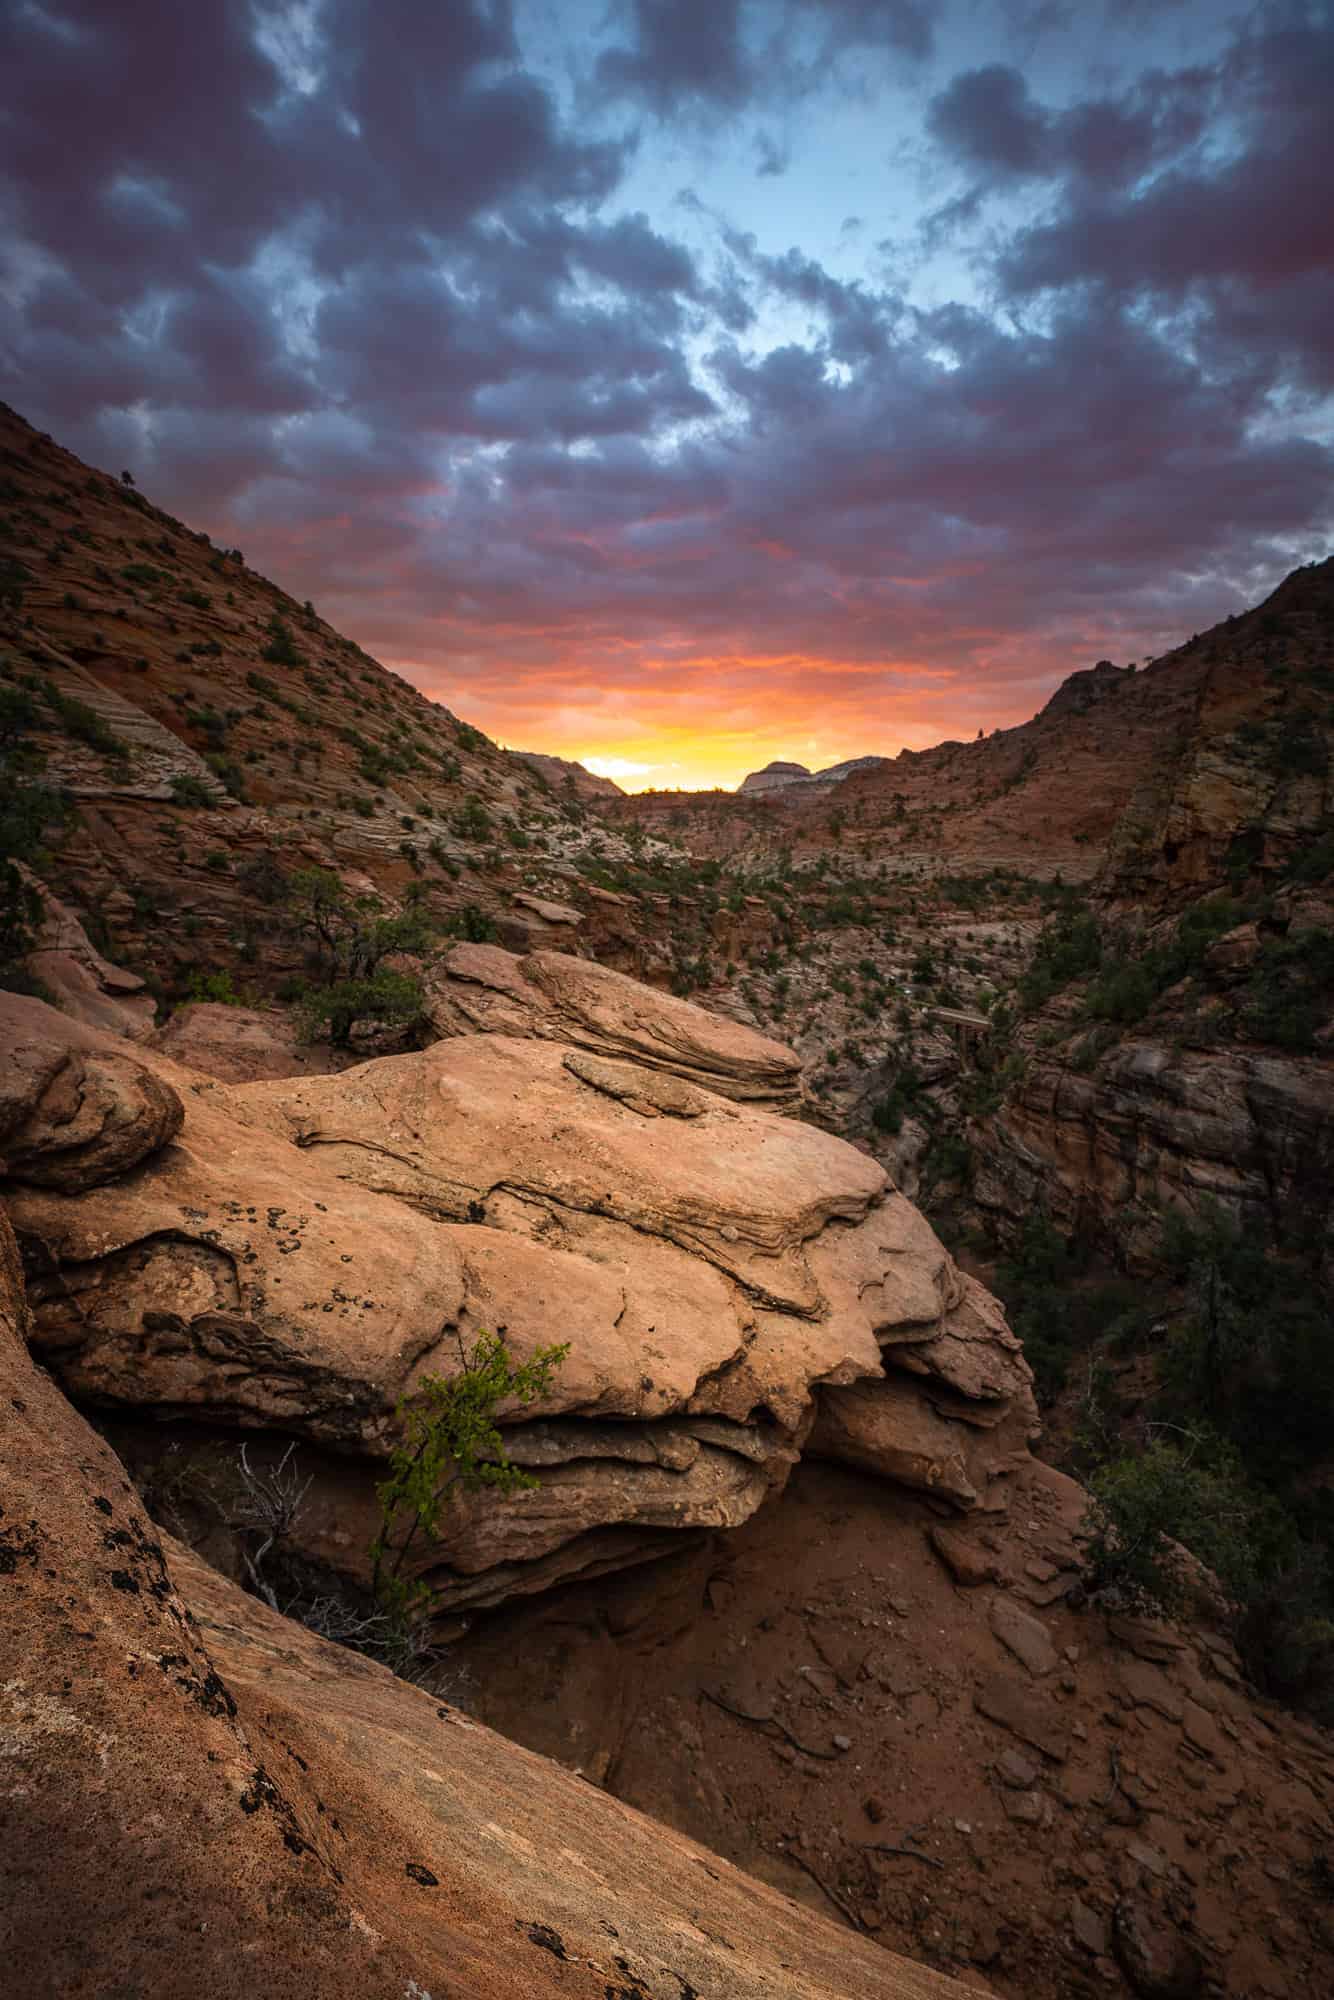
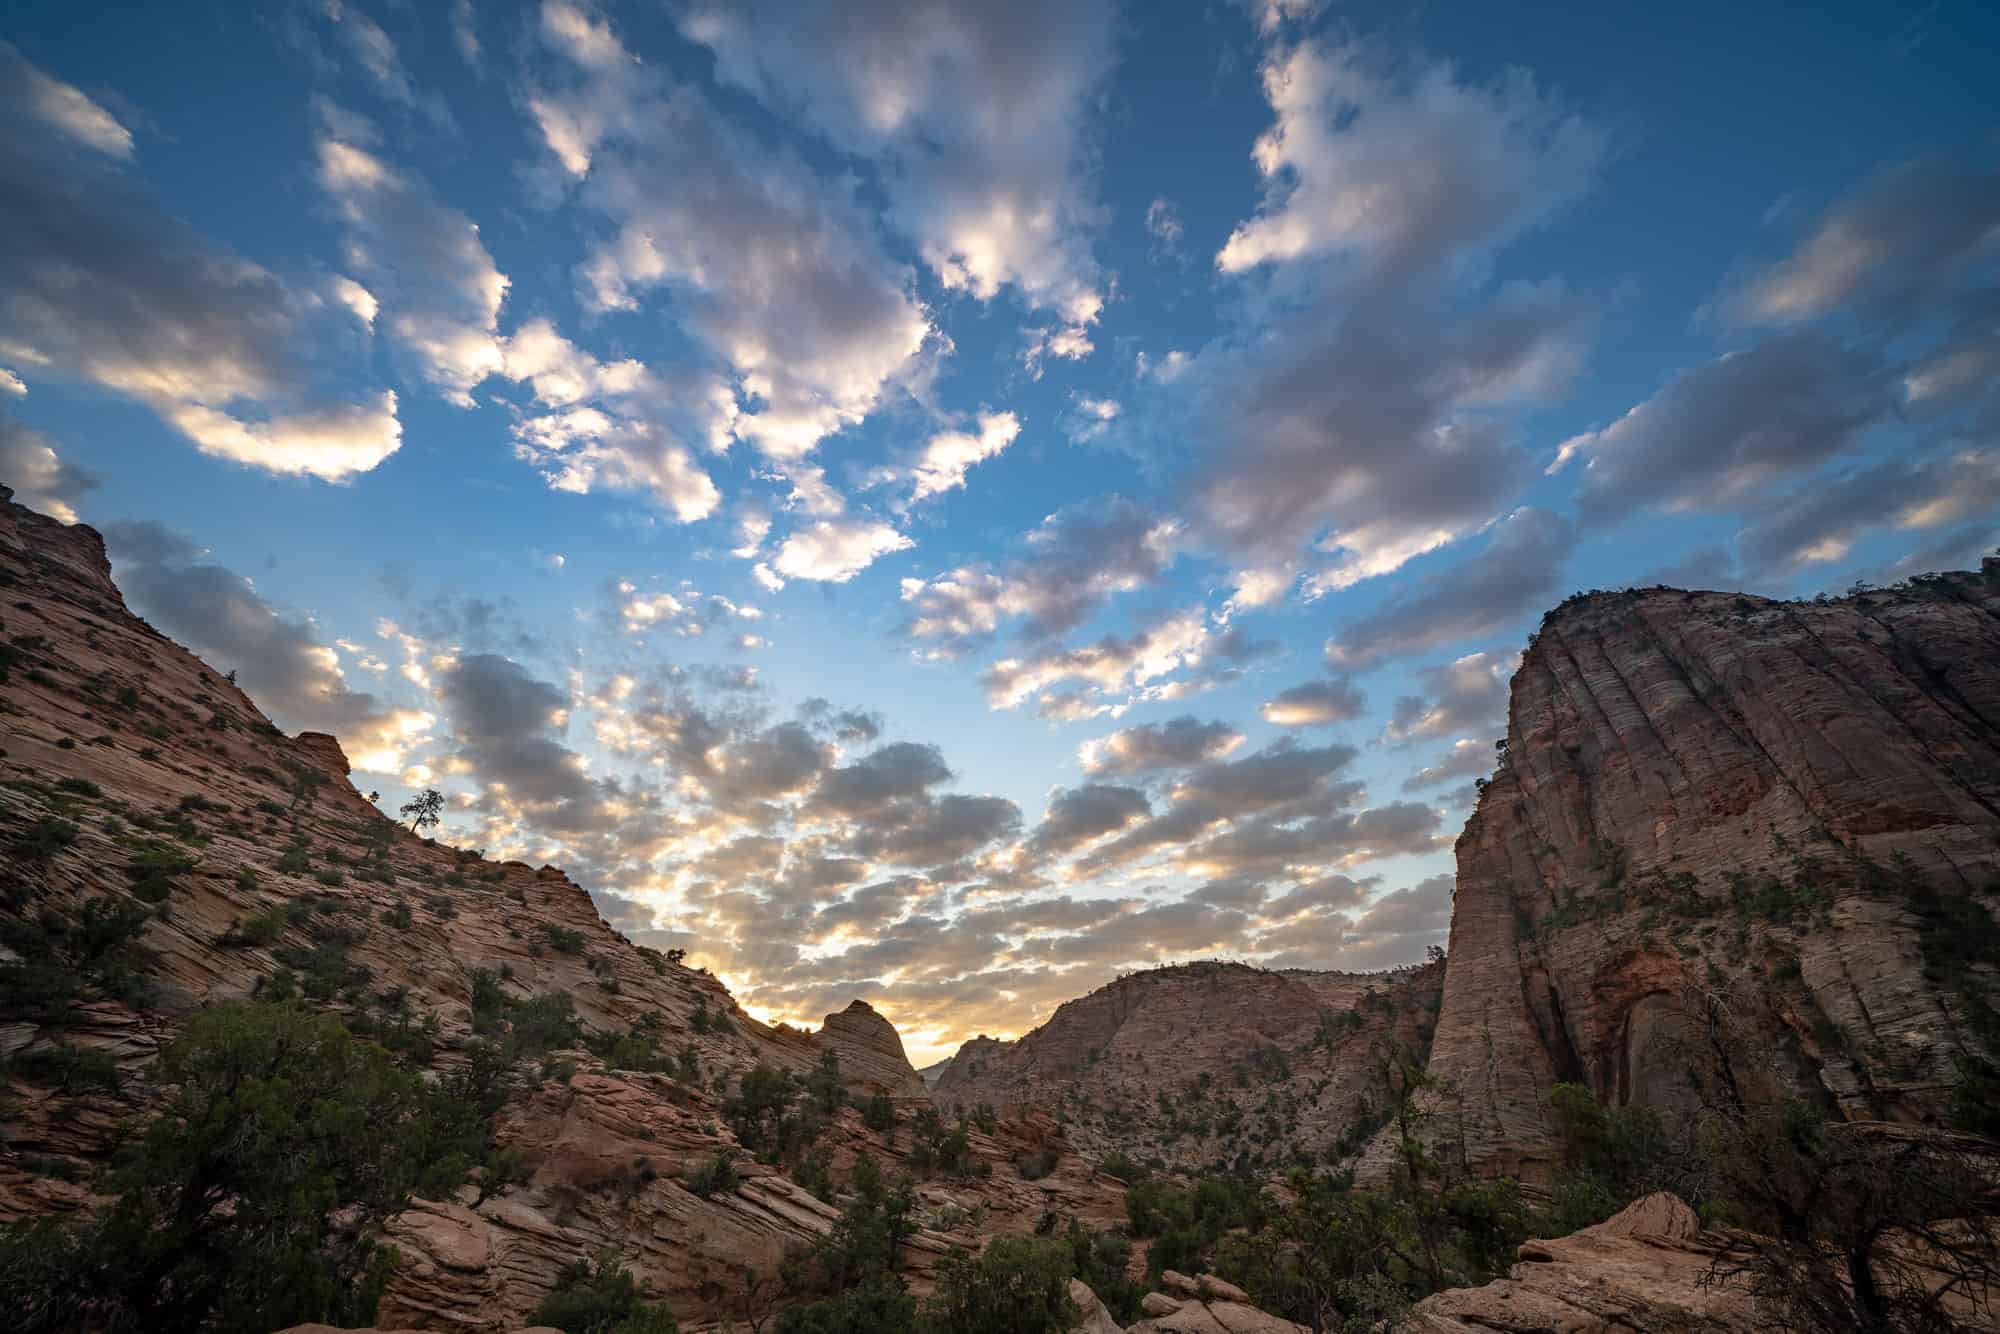
The Hike To Canyon Overlook at Sunrise
On our way out the day before, to the Canyon Overlook, we noticed a few spots that faced the other direction (toward the sun). So we decided to head out there again and just shoot in different places. It ended up being kind of a cool and moody sunrise with the clouds and the light. It was one of those shoots that makes you feel good because there’s no “Stand Here” signs or anything like that. We just put our tripods down where we felt it would be a good shot.
Settings: f/8, 1/8 sec, ISO 100, 14mm (Sony 12-24mm GM)
Settings: f/11, 1/100 sec, ISO 100, 12mm (Sony 12-24mm GM)
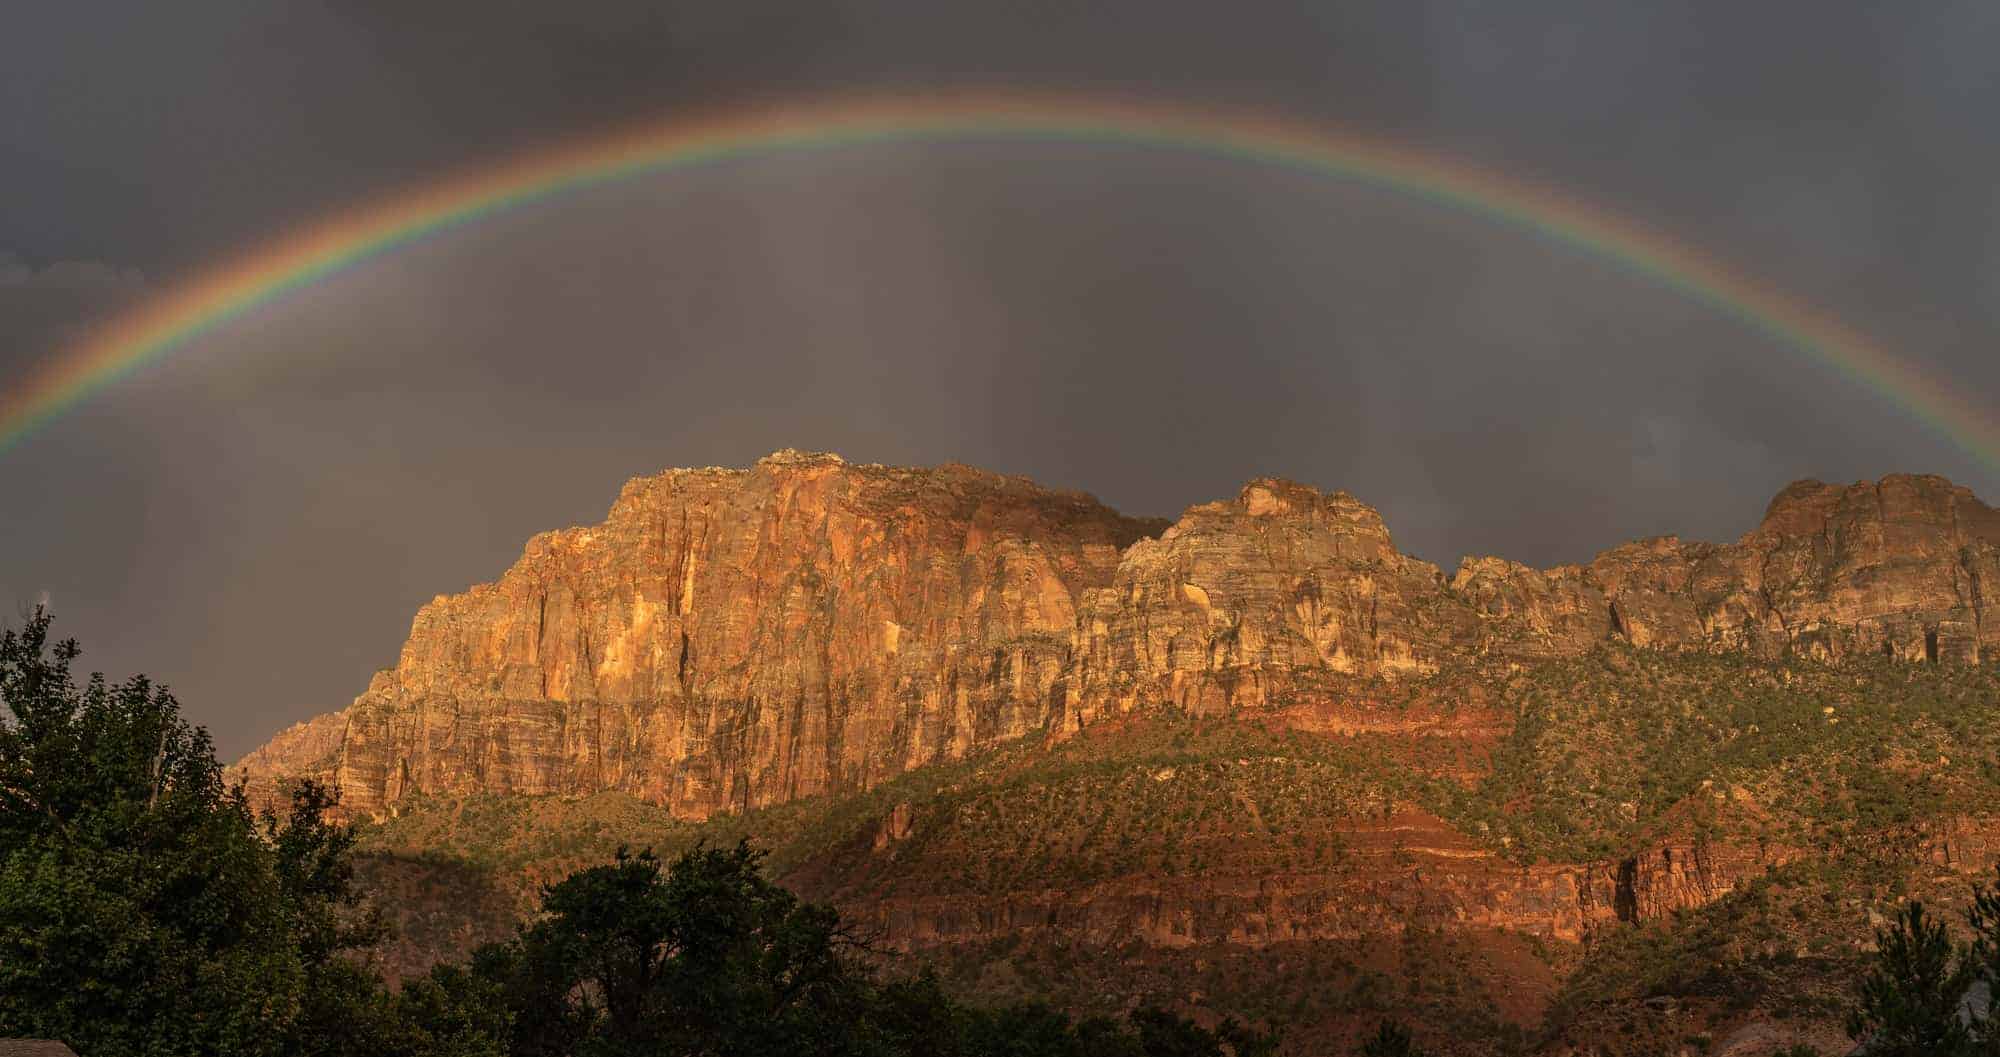
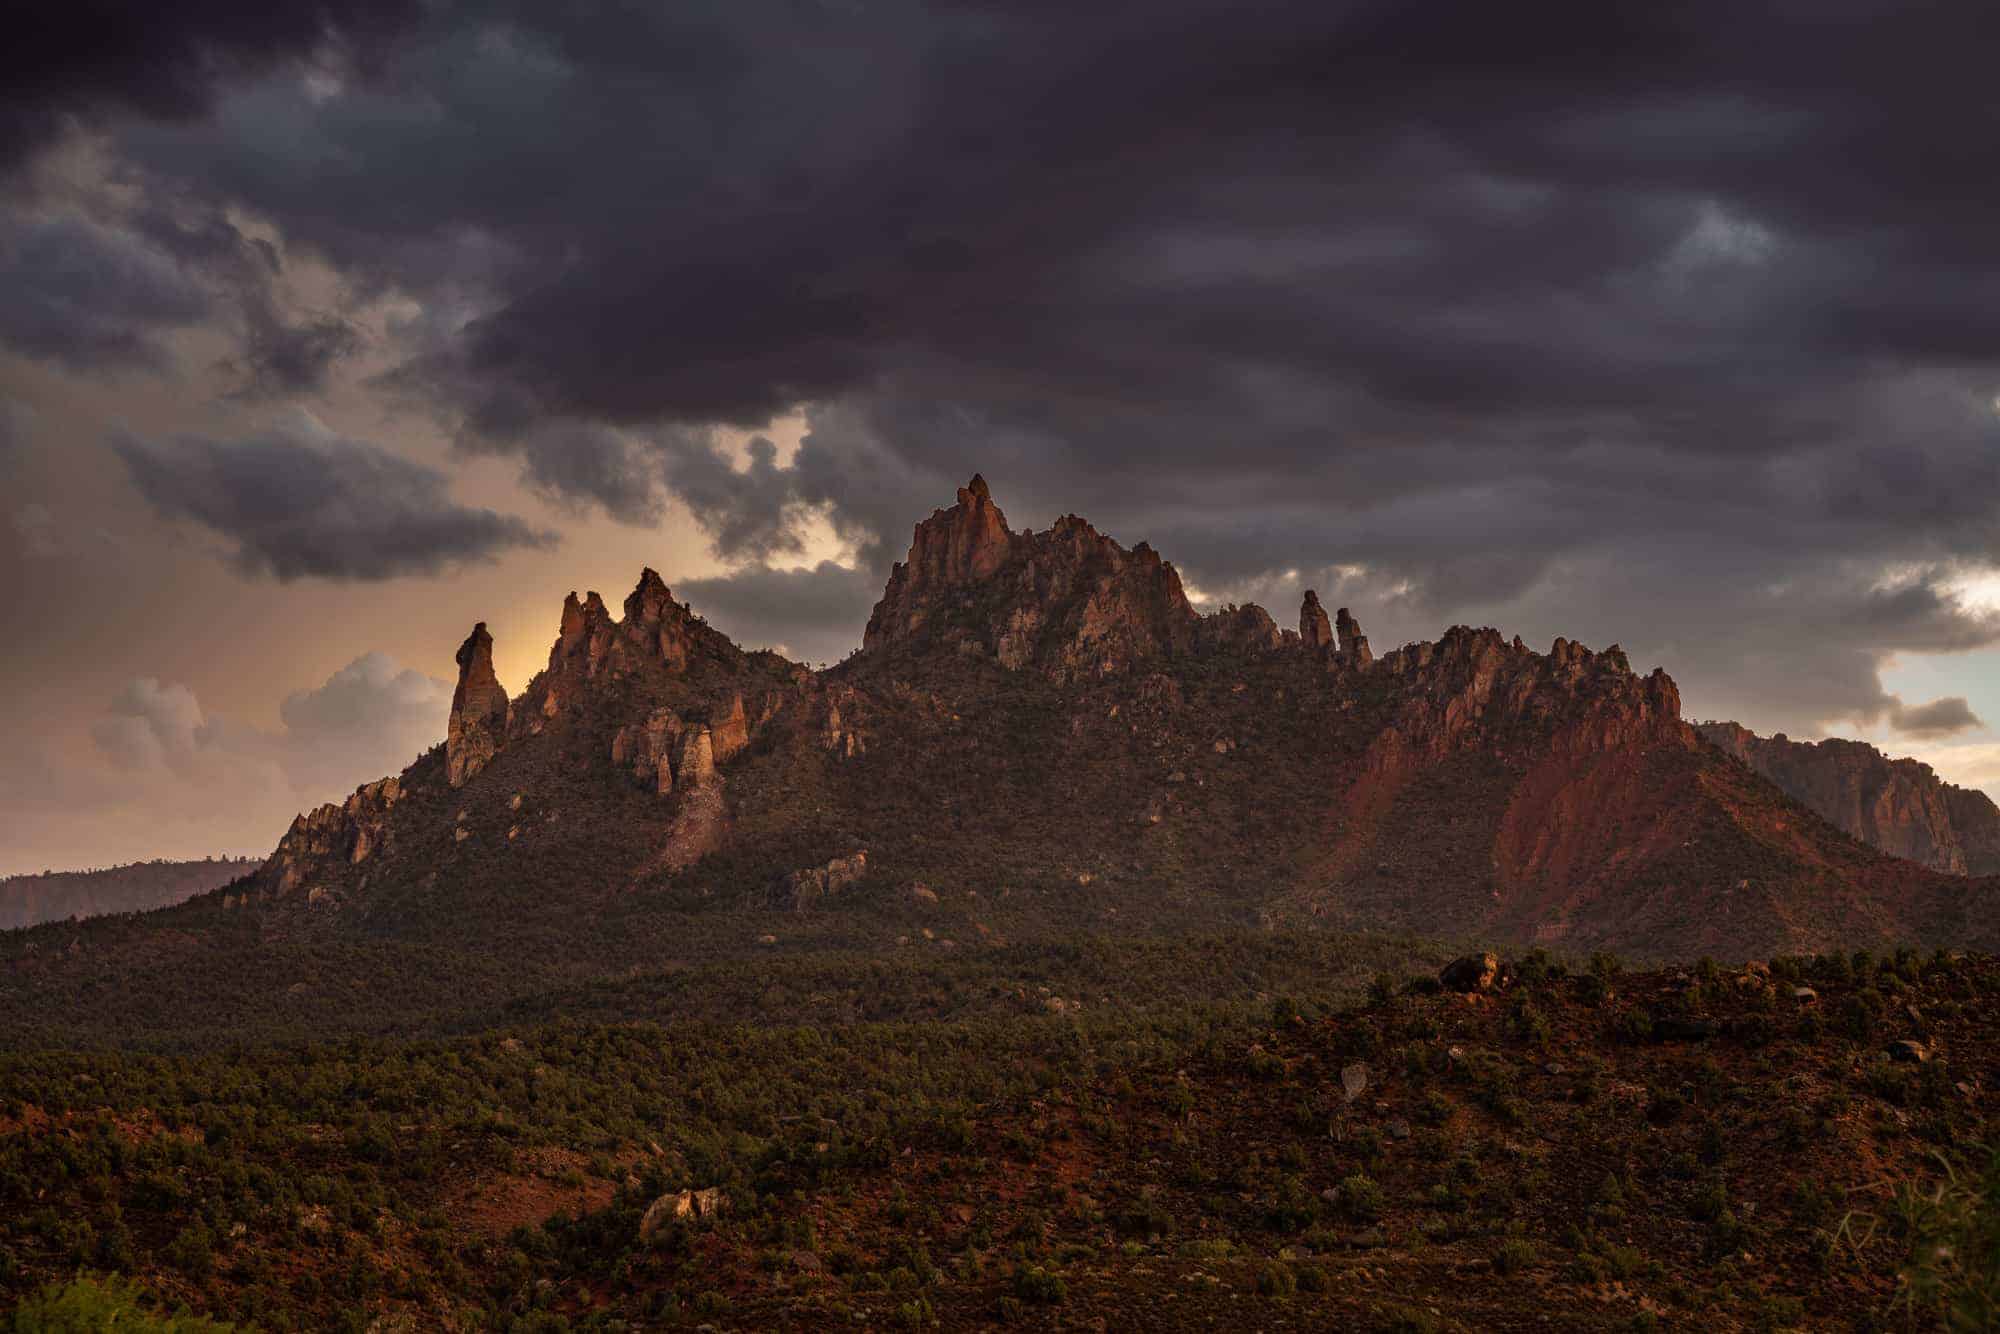
The Storm
We ended the trip with what Blake and I call the doulbe-rainbow-ultimate-unicorn sunset. We didn’t really know what to do on our last evening in Zion. It had rained all day. We had a slot canyon spot we wanted to go to, but it would have been too dangerous with the chance of flash flooding. I heard they even closed the Narrows the next day for just that reason.
Anyway, we had seen a photo in our room and after a little searching we found it was a spot down the road from us that you just pull off to shoot. There’s a parking lot, but it’s nothing fancy.
So… picture this. The weather was looking pretty blah. We had this spot in our back pocket as something we could go shoot if things cleared up. So Blake and I went to dinner and had a couple beers. It started raining hard, so we sat there for 45 minutes after we were done, just so we didn’t get soaked on our walk back to the room. It finally let up and we walked outside. It took us about 20 seconds of looking in disbelief, as noticed this behind us:

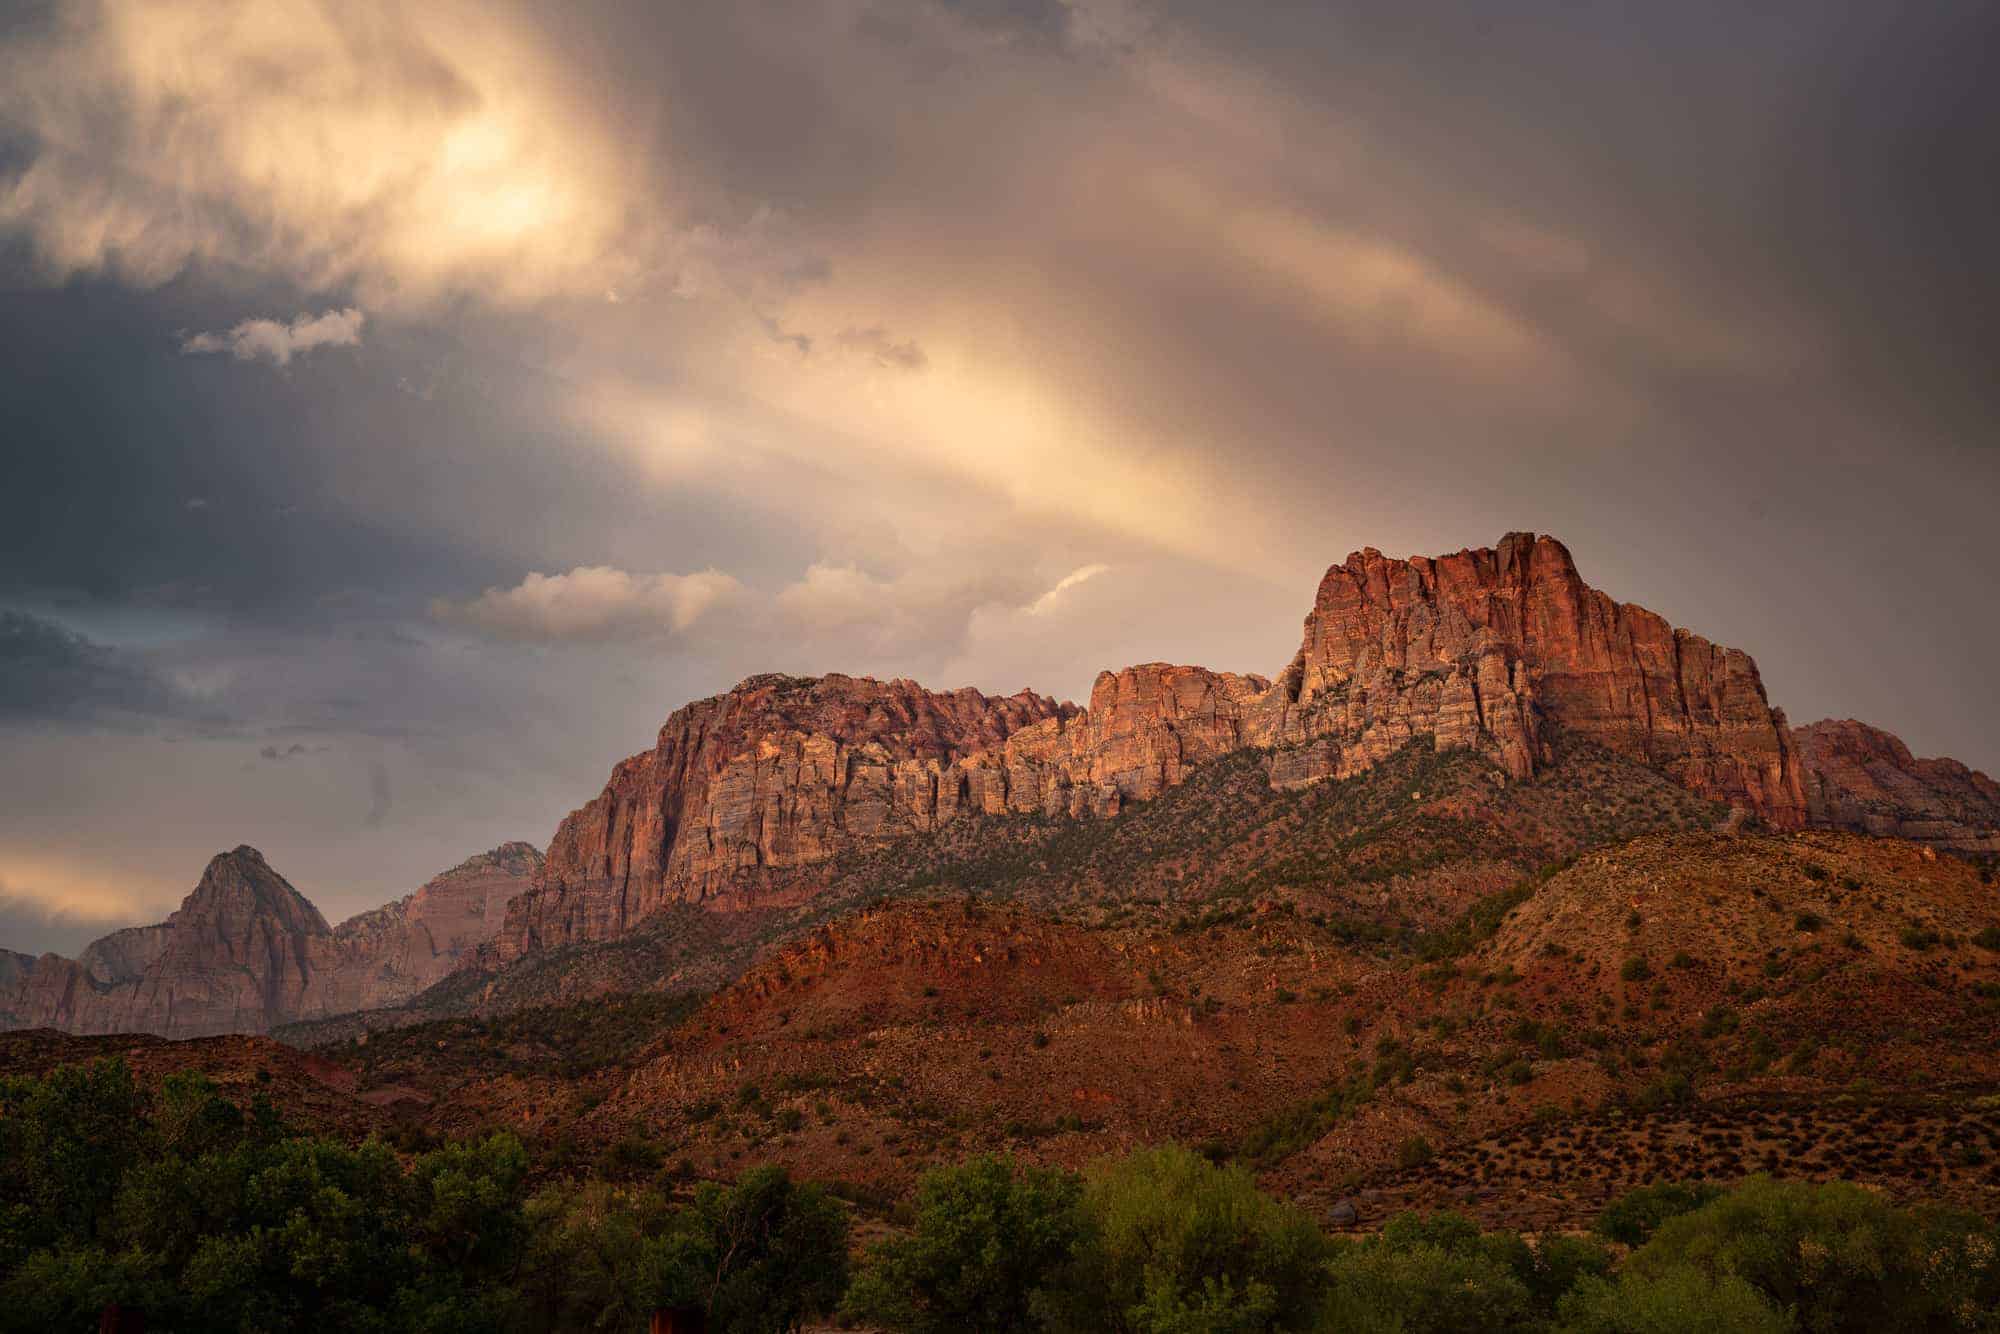
Blake and I looked at each other, snapped a quick iPhone shot (above), and then sprinted back to the room to get our gear. We shot a few photos from behind the hotel, and then jumped in the car to that spot we had seen online. And for the next 45 minutes we were treated to some of the stormiest and most beautiful scenes.
Settings: f/9, 1/125 sec, ISO 100, 33mm (Sony 24-70mm GM)
Settings: f/9, 1/10 sec, ISO 100, 70mm (Sony 24-70mm GM)

Settings: f/9, 1/10 sec, ISO 100, 44mm (Sony 24-70mm GM)

Back when I first really got into landscape photography I used to look at the weather forecast and hope for sunny days. But now, I look and hope for a chance of some stormy weather. I’d say that on this night, we got it ?
Settings: f/9, 1/400 sec, ISO 800, 128mm (Sony 100-400mm GM)
Settings: f/9, 1/10 sec, ISO 800, 100mm (Sony 100-400mm GM)
Settings: f/11, 1/10 sec, ISO 100, 24mm (Sony 24-70mm GM)
A Great National Park!
Well… thanks for stopping by. Zion is one of the top national parks out there and I highly recommend a trip there. It’s about a little over a 2 hour drive from Vegas (In and Out Burger stop included!). It’s very accessible for all types of photography and no matter what your hiking or skill level, I think you’d find spending a few days there really inspiring for your photography.
I hope you enjoyed and don’t forget to swing by Blake’s website if you haven’t already… Have a good one!
 I love teaching and photography... In that order. I feel that enjoying photography, and photo editing can get WAY too complicated. So my personal mission (and favorite thing to do), is to create education that simplifies the process of taking great photos, and how to edit them to get the results you’ve always wanted.
Matt, the combination of the photos and stories helps to add another dimension to your trip. The one B& W had such a Ansel Adamsesque quality to it. I envisioned seeing some grain with the new and latest feature from LR. Thank you for sharing.
Matt,
These photos are amazing and I enjoyed your stories along with the photos! Thanks for sharing your journey there. Your photos/stories are a true inspiration to make the trip there!
Hi Matt, great photos and explaining your gear and settings. Giving us the details of your hikes was a great idea. Thanks so much for sharing.
By the way, Happy Anniversary.
Semper Fi,
Joe W.
Wow! Why do I love photography? Because I LOVE light! And you captured the magic of light at Zion. Thank you for sharing.
Yup, Zion is number 1. I’ve been to 41 National Parks. While working as an AstroVIP at Bryce, Zion asking me to come and do astrophotography. They also gave my wife an assignment. My life is near perfect but now I need a “Fresh Start.”
This Florida guy (Venice) needs you once again, Matt. See ya next week.
Beautiful pictures Matt!! I was there on September 11 this year and loved it!! I now want to go back. I don’t think there is a bad spot there regardless of the weather!! Nice job!
I’ve been planning a trip to Escalante to shoot the slot canyons with a buddy. You made Zion look like a “must stop and see” too. Will add a few more days onto the trip.
Also, love that you promote the local Tampa Bay area breweries (t-shirts anyway)!! Keep it up.
-Alan
Really enjoyed your pictures Matt. Thank you for sharing! Very inspiring for those of us photographers that don’t have the talent you have! Keeps me hoping!!!
Thanks Cheryl – a huge part of this is getting your camera in to a good place. Had I gone out on a shooting trip here in Tampa, the photos wouldn’t have been nearly as interesting 🙂
What a fantastic story Matt. I love the pictures and appreciate the story along with it, as well as your settings. I live in S. Fla so I’m dying to get out west with my camera gear. Very inspiring photos and why I like to follow your stuff. You always put so much into what you do and it motivates me.
Thanks
Glad you like it Dave. I love FL, but sometimes it’s nice to get away to different scenery 🙂 Thanks!
Can you ask Blake what his magical hat is? I need such a hat if I am going to get great images such as the ones you guys got:)
Matt, I sure enjoyed your diary of this awesome trip with your friend. The pictures are just beautiful and inspire me to get out more and visit new places. This park is high on my list! Thanks for sharing!
Matt ,
If I remember correctly, a few years ago you wrote an article stating that you had given up on the ND filters. This current post on Zion shows that you you are again using the ND filter. Should we be using the more often. Which also means a tripod always.
Hi. My post was about giving up on “Grad” ND filters since they can easily be replaced. ND filters are a necessity if you want to extend the shutter speeds: https://mattk.com/why-graduated-neutral-density-filters-are-dead-to-me/
🙂
Matt,
Thank you for sharing your adventure & beautiful images!
If you were to pack even lighter for this same trip, what gear would you pack?
Hi. I’d bring my Sony a6500 and all f/4 (cheaper and lighter) lenses 🙂
Thank you
Hi Matt,
Beautiful series of landscapes at one of the west’s most inspiring park. Yup, lots of people. Like you I became discouraged with the crowds “messing up my spot” for a picture. Then a friend reminded me of Photoshop content aware. I took a breath, relaxed and began shooting some fair photos, nothing like yours. Thanks so much for your wonderful work and motivating story.
Note: Just returned from Banff National Park (Alberta) and found crowds of folks enjoying the scenes. Recommend you consider this location sometime. Just remember, Photoshop…to elminate the people.
Thanks Jim. I’ve been to Banff and it’s one of my favorite places. Beautiful!!!
Great post Matt! We’re headed there in 2 weeks and this just gets me more excited for my first trip back to this great park in 14 years. I’ve been to the Canyon Overlook before, but didn’t make it to the Narrows as I opted for Angels Landing on my short stay in 2004. Looking forward to doing the Narrows this time around. 🙂
Thank you for sharing these excellent Zion np pictures.Two years ago my wife and I traveled to the mighty 5 nps in Utah and ended the trip in slot canyons AZ. I’ m 70 years old and we did a 4 hour hike in the narrows. We got some spectacular shots in Zion, considering I’m an amateur.I think it’s very important to wear proper shoes and clothes and a plastic bag for the gear in case of an accident. By wearing proper attire we can avoid a fall and injury to ourselves but also not ruin rest of the party’s vacation.
Now I have an important question for you.
I switched to Sony mirrorless from Nikon DSLRs mainly because of the weight. I traveled to Machupicchu and the Galapagos last year and we have just returned from a great vacation to Southern African countries.
I ordered a Sony A7 lll in May but couldn’t get it for the trip because tremendous demand for this camera.
Finally when I got the camera and the lenses I realized the weight was too much.
I carry two a6000 cameras , one with a 10-18 mm and the other with 18-200 mm lenses. Easy to carry. My question is, is it worth the switch to a full frame camera? Should I just get a newer app-c Sony?
Thank you,
Best regards
Rama
Hi Rama – Yes, the A7 series is really not that much lighter. And if you buy all of the 2.8 lenses it’s not lighter at all 🙂
Full frame gives you two advantages:
1) Better low light performance as you can crank up your ISO and not get as much noise. Usually only applicable if you’re printing larger.
2) Large prints because of larger Megapixels.
If either of those matter to you then you’d go full frame. If not, you have a great camera in any of the a6000 series.
Thanks!
Thank you for the advice. I will wait and see if Sony will release anew sos camera in November. Otherwise a 6500.
I have to learn LR. I will buy No light no Problem and see if I can improve my photos.
Rama
Matt, thanks for sharing some great photos of Zion. I was just at Zion & Bryce over the past weekend. Truly both were magnificent places to visit. The views & photo ops were truly worth fighting the crowds. The trick was getting out early. Sorry I missed you been following you for years.
Thanks Joe. Honestly, other than the Narrows, we didn’t experience any crowds. It was great!
Hi Matt, it you have any sunrise pictures also at same locations, would be fun to see them side by side comparison. As always, beautiful compositions specially how you captured the water in verious shutter speeds.
Kind regards.
Great to see your Zion images Matt. I just got back from my first visit. The place is AMAZING! I actually recognize some of the scenes you captured. I can’t wait to get back.
Beautiful images, thank you for sharing them and for all the tips and information on the photos and post processing. Glad to know you brought only the essential equipment. I would have to bring even less because I can’t carry that much weight. Thanks for all you do!
Beautiful shots Matt. Thanks for sharing. Based on shutter speeds I’m guessing you set up on a tripod in the Narrows? Was that a problem lugging a tripod while balancing on rocks and waist high water?
Thanks.
Hey John. Thanks! The water usually wasn’t waist high when I was shooting and in the good shooting spots. Usually more around the knee level. And yes, I used a tripod and sometimes it was a little hard if the current was stronger but nothing really to speak of. Overall it was a lot of fun 🙂
There is so much about this blog that I enjoyed that I don’t know where to start. I guess that because I have been to Zion to photograph that is was a fun trip down memory road to both see your shots and read your commentary about the crowds in the narrows. I, too, rented gear from
Canyon Outfitters, and was so glad. But I never thought to use any of my filters. 🙁 Your storm images are amazing, and you were truly lucky to have Mother Nature favor you. But I have to say that my images of the setting moon at dawn are at least as good or “better” than your dawn shots in an almost similar spot. Zion is amazing and always worth another photo trip. Thanks for all the info on your settings.
Thanks Betty – Glad you like them and very glad you got some better ones than me 😉
Hope you’re doing well!
Thanks for sharing your Zion trip photos and notes as I’ll be heading that way this fall. It sounds ( and looks) like you had a wonderful trip. Your photos, as always are beautiful! Do you have to walk far up the narrows to get such gorgeous scenes for photos? I’m sixty – five and can walk on trails for a few miles with my camera gear: I was just wondering how far you need to walk in the narrows and what kind of shoes do you wear?
Hi. You have to walk a good 30-60 minutes past all of the people. It’s rocky ground but if you take it slow it’s very doable. I rented the shoes from Canyon Outfitters. Just show up and tell them what you’re doing and they’ll give you the right ones. Good luck!
Matt, these are exquisite! I wish I had been there with you guys (I was on a workshop earlier this year with Blake and had a great time learning from him). I had to laugh when you said Blake convinced you to stay even though the blue hour prospects did not look promising. Blake will stay until it is pitch black out! And then he’ll want to shoot stars!
Ha! I’m a blue hour guy myself. I actually prefer it over sun. But I was having nothing to do with night – just not my “thing”. Luckily the Milky Way and moon weren’t in the right place or I would have had to tell Blake to stay by himself 🙂
so Matt, I am going to Las Vegas and I am thinking of a day Trip up to Zion… If you had 1 day what would you recommend?
Hey Steve – if it were me and I had a full day from Sunrise to sunset I would:
Sunrise – Canyon Overlook (easy hike)
Breakfast in Town
Late Morning / Early Afternoon – Hike the Narrows
Grab dinner back in town
Sunset – Watchmen from Canyon Junc Bridge
Beautiful pictures Matt! Thanks for sharing. Zion is one of my top 3 favorite parks. Highlight for me is the hike into the narrows.
I visited Zion and Bryce a few times with my Grandkids and one summer Zion asked me to do Astrophotography. I was at Bryce as an Astro VIP and said “Yes.” Duh!
Both places gave me a 3-BR home free. Zion even invited my wife to write grants for them so she joined me in paradise. The best summer/fall of my life.
Beautiful and inspiring – thanks for taking the time to document your trip so thoroughly and to provide photo details.
No Light No Problem
I have enjoyed looking at 2 high end pro’s shoot the same location and seeing how they are the see, same yet very different. My eyes say: yeah that is the way I see it\Nah I want more detail/ he got the inner light just right / that sky works.
A great learning opportunity for me. Thank you.
Thanks Peter. Glad you liked it! 🙂
Beautiful photos.
One thing to think about when you see a beautiful rainbow scene and your lens isn’t wide enough to capture both ends of the rainbow is to take multiple shots and stitch a pano.
Thanks Neil. Good idea! For my shot, the ends of the rainbow weren’t elements I wanted in the scene (there was a building to the left) so I deliberately cropped the ends of the rainbow out as I like this composition better.
Great work
Thanks for sharing Matt! I’m doing 6 parks in southern Utah the first two weeks in September including Zion. Having never been there your info was very helpful and inspirational.
Fantastic shots and wonderful commentary. Thanks for sharing your thoughts, processes, and settings.
Great job Matt! I’m from Canada and would love to go there one day.
As always, your photos are amazing. You did so much to inspire me in Costa Rica and you just keep inspiring me more and more. When I feel too old to go out and look for photo opportunities, I just look at your photos and video course and get reinvigorated. Thanks for sharing!
You’re welcome Carol. Costa Rica wasn’t the same without you this year! Keep shooting 🙂
I had one day to visit the park in March a couple of years ago. My husband had a work trip to Salt Lake City and we decided to spend the weekend (one day at Zion and one day at Bryce National Park). Despite the drive, it was an awesome decision. My husband and I managed to get in a lot of hiking both days. We made it to the start of the narrows, but opted not to hike through the water because we didn’t have the right gear. Hopefully one day I will get back there and will have more time to plan so we can hike the narrows.
Any flack about using a tripod?
Nope. Not one bit. That’s just for organized photo groups. We sat on the bridge 2 evenings and had multiple rangers come by and no problem.
Did you make it to Angels Landing? I still shutter from the fear I endured from that height. Great, great shots Matt!
It was closed 🙁
Stunning photos,as usual! You’re definitely an inspiration to many of us to keep shooting.
Dude, that was such a blast! Great photos, too! I enjoyed reading your thoughts on it all. Brought me back, way back… to last week 🙂 And that Arches theory is movie worthy and you know it 🙂
It is definitely an interesting theory… I really think you should go public with it. Like really public. And share with EVERYONE!!!
Is that the Ansel hat, Blake? ??
So agree with your comments Matt. Having been to Zion 3 times in the last year, I can say it’s definately (along with Escalante) my fav National Park.
Sadly, Zion is talking about making people book ahead to enter the park as it’s been so popular and busy the last couple of years. And they’ve also issued a tripod ban for organized photo groups. But if you head there in April/early May, or September and later, no lines for buses, not too many people and more varied weather. And the reason for the increase in numbers: Utah has been advertising their 5 National Parks like crazy. These places are so amazing, I hope everyone continues to have an opportunity to visit. And brilliant images, by the way Matt. Would love to have you join one of our group (of seven) Photo trips one day ?. Regards, Crewella Devile!
Thanks! You are so right Carol! I can’t travel through an airport or watch TV in the west without seeing that ad for the “Big 5”. As some pointed out it being social media to blame – it’s not. It’s Utah! But they seem to be handling it well. There were crowds but the crowds were all handled well throughout our trip. Thanks!
Being with Carol in the “group of seven”, shooting with the A7R3, and having followed you for a long time (initially a Lightroom workshop in the Detroit area), it would be awesome to have you join us sometime in a photo shoot. I’ve purchased ALL of your courses, and thank you for help with fellow photographers.
Matt your images are amazing . You always inspire me to try do better with mine.
Mark
Thank you Mark!
So sad that our National Parks are being overrun by people. I think that us photographers are a big blame for it. Our pictures on social media draw the crowds from all over the world. I don’t know what the solution is but to charge more to get into these parks. But with the affluence of the world now, I think people would pay big to get into our parks.
I don’t think it’s sad at all Jay. Isn’t that what the parks are for? To enjoy? If you take the bus through the park, you’ll find that people swarmed upon this park as soon as they found it in the early 1900’s. Sure, swarms back then were smaller, but it’s not a bad thing. The parks are protected and meant to be seen. The more people see them, they more they love them, and the more they become protected and ingrained in our world. While there were crowds, everyone was being respectful. Remember, the VAST majority of people are good people. I think they’re doing a great job with the park, while at the same time opening them for all to see.
Well said Matt
Excellent points, Matt. I would add that if you want to get away from the crowds in the national parks, it only takes hiking a little ways off the beaten track.
It always amazes me that you have to pay to enter the National Parks in the USA. The natural world should be free for everyone to enjoy.
And how do you pay for the facilities? Garbage pick up? Rangers?
Taxes!! Or perhaps Steve will take care of it for us perhaps?
Just hang on…once you reach the upper years, the price goes down!!
Zion is so aptly named, it is awe inspiring, thanks for sharing these tips. I will use them for my next trip.